Two wheels — same diameter, same width, same offset, same bolt pattern. One clears your big brake kit with 5mm to spare. The other contacts the caliper before the lug nuts even seat. This isn't a defect. It's geometry, and it's the single most-misunderstood part of aftermarket wheel fitment.
Brake clearance is the variable most buyers ignore until the wheels show up and the calipers won't fit inside them. And once you've spent $1,800 on a custom-finish set, returning them is rarely an option. The good news: this is a measurable, predictable problem. With a printed template, a digital caliper, and ten minutes per corner, you can know with certainty whether a given wheel will clear before you commit to the order.
Here's how to measure it, what tolerances to hold, and how to read the variables that actually decide fitment.
Brake-to-wheel clearance comes down to five interacting dimensions. Diameter and offset get all the attention because they're printed on every spec sheet, but the variables that aren't listed — spoke design, barrel profile, and the caliper's own geometry — are usually what decide whether a wheel fits.
This is the gross-level constraint. The brake rotor's outer diameter has to fit inside the wheel barrel, and the caliper has to fit on top of the rotor without contacting the inside of the wheel. The industry rule of thumb is that wheel diameter should equal rotor diameter plus four inches: 11-inch rotors clear most 15-inch wheels, 12-inch rotors need 16-inch wheels minimum, 13-inch rotors generally require 17-inch wheels, and 14-inch rotors typically push you to an 18-inch wheel.
That's a starting point, not a guarantee. Some OEM 17-inch wheels won't clear a 13-inch big brake kit because the inner barrel profile is too tight, while certain 17-inch aftermarket wheels with deeper internal pockets will. Diameter gets you in the ballpark; the rest of the variables determine whether you actually fit.
Offset is the distance between the wheel's mounting surface (where it bolts to the hub) and its centerline. Higher positive offset pulls the wheel face inward toward the suspension, which moves the spokes closer to the caliper. Lower or negative offset pushes the wheel face outward, increasing the gap between the spokes and the brake assembly.
For a fixed brake setup, every 5mm of additional positive offset moves the back of the spokes 5mm closer to the caliper. That's enough to turn a 5mm clearance margin into a hard interference. If you're choosing between two otherwise-identical wheels and the spec sheet shows different offsets, the lower-offset wheel will almost always have better caliper clearance — but at the cost of more fender protrusion. Our breakdown of how wheel offset works covers the full geometry, and the companion piece on offset-related fitment problems walks through what changes when you push the wheel in or out from spec.
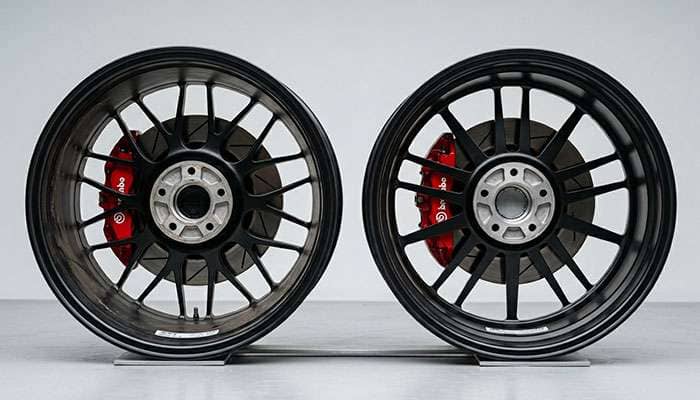
This is the variable nobody publishes and everyone underestimates. The shape of the spokes — specifically how they curve relative to the mounting face — controls how much room exists behind them for the caliper. Concave spokes that bow inward toward the brake assembly create a recessed pocket where the caliper can sit. Flat or shallow spokes don't.
This is why two wheels with identical diameter, width, and offset can produce completely different fitment results. A 19x9.5 ET35 wheel with deeply concave spokes might clear a Brembo GT kit cleanly, while a 19x9.5 ET35 wheel with flat spokes interferes by 8mm at the same caliper. The barrel profile matters too — some wheels have a smooth inner surface that can accommodate larger rotors and tall calipers, while others have ribbing or step-downs that intrude into the brake space. Deep-dish wheels are the extreme end of this concavity spectrum, with very pronounced inward curvature that opens up significant caliper room.
You can't tell from the spec sheet. You have to look at the wheel — or measure it.
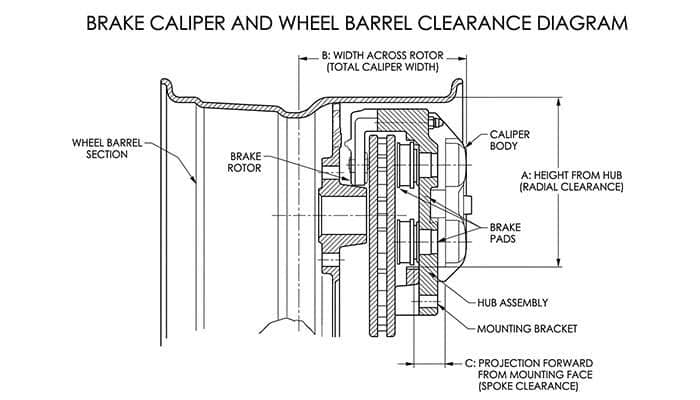
The brake side of the equation has its own three-dimensional footprint. Caliper geometry is defined by three measurements: height (how far it projects radially from the hub), width (how wide it is across the rotor), and projection (how far it extends forward from the hub mounting face toward the wheel).
A four-piston monoblock caliper has a different envelope than a six-piston caliper at the same rotor size. Some calipers are "race-style" thin and tall; others are wider and shorter. Aftermarket big brake kits from different manufacturers — Brembo, Wilwood, StopTech, EBC, AP Racing — each have their own geometry, and that geometry is what gets measured against the wheel's internal space. The good news is that most reputable brake manufacturers publish 1:1 scale CAD templates of their caliper profiles for fitment checks. We'll use those in the measurement section below.
This one comes up rarely, but when it bites, it bites hard. If a wheel is hub-centric to a smaller bore than your hub provides, hub-centering rings sit between the wheel and the hub, taking up axial space. If a wheel is lug-centric, it can shift slightly off-center during torque-down, which can change effective clearance by a millimeter or two — small in absolute terms, but enough to cause contact at the tightest point on a marginal fit.
For most brake clearance work, hub geometry is a second-order factor. But if you're chasing a 1–2mm margin, it matters. The fundamentals are covered in our piece on wheel center bore and the comparison of hub-centric vs. lug-centric wheels.
Different manufacturers publish different minimum clearance requirements, and it pays to know which spec applies to your kit. Here's how the major brake brands stack up:
Brake Brand |
Minimum Clearance Spec |
Where Measured |
|---|---|---|
Brembo (Performance/GT/GT-R) |
3mm in all directions |
Caliper to spokes and caliper to barrel |
EBC Brakes Racing |
5mm minimum, all directions |
Outboard caliper face to spokes AND caliper top to barrel |
Ksport |
2mm minimum |
Caliper edge to wheel |
StopTech / Wilwood |
3mm typical (kit-specific) |
Per template; varies by application |
Field practice across most performance shops splits the difference at a 3mm working minimum, with 5mm being the conservative target on a daily-driven car. The reason for that margin: under cornering load, suspension flex, and thermal expansion, the apparent static gap can compress. A 2mm static clearance can become zero contact under hard cornering, and that's how scrape marks end up on the back of brand-new spokes.
For track use, hold 5mm minimum without exception. Heat soak makes calipers grow, and mid-corner suspension loading can deflect the wheel structure by a millimeter or two relative to the brake. Margin protects you when everything moves at once.
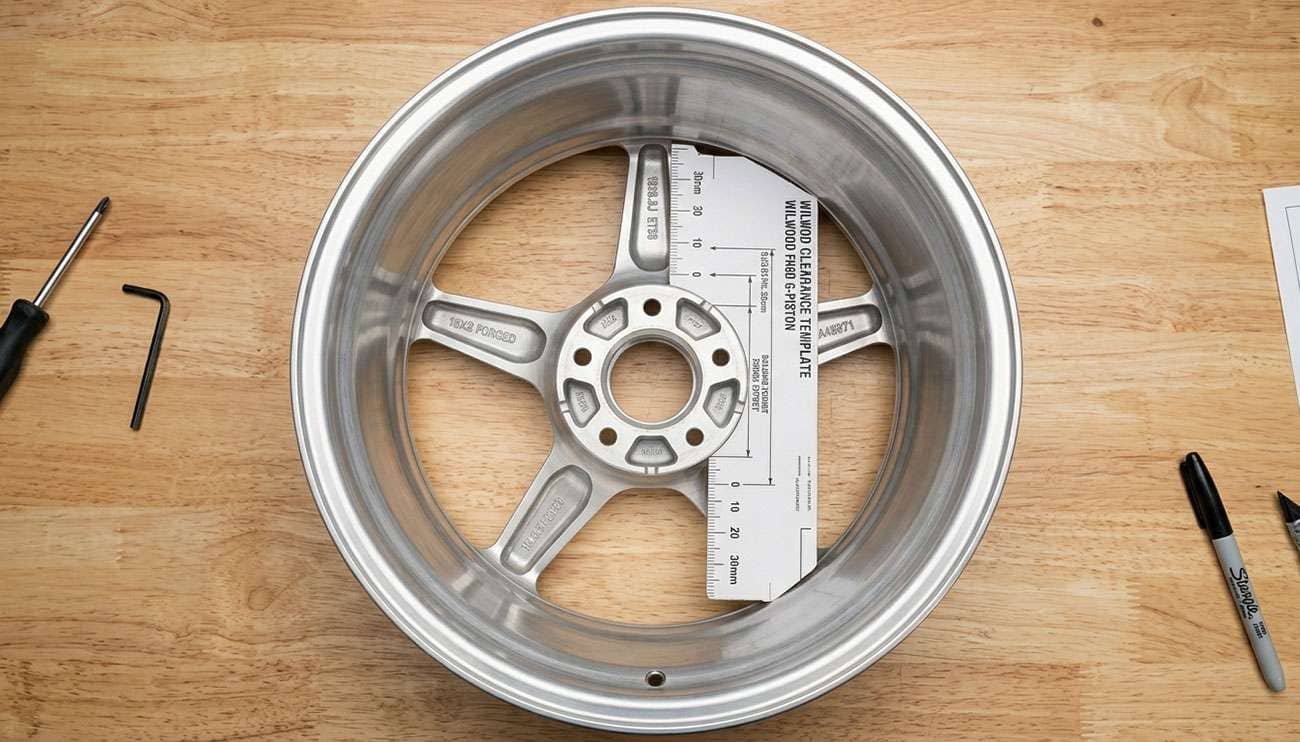
The template method is the gold standard for verifying fitment before you buy wheels. It uses a 1:1 printed cross-section of your specific brake kit's caliper, bell, and rotor, which you then position inside the candidate wheel to check for contact. Brembo, EBC, StopTech, and most other reputable brake manufacturers publish these templates as PDFs on their fitment-support pages.
You need physical access to the wheel barrel and the back of the spokes. With the wheel off the car, set it face-down on a clean shop towel or piece of cardboard so the spokes are pointing up at you. Brush out any brake dust or debris from the inside of the barrel — even a small accumulation can throw off your measurement.
This step is where most DIY measurements go wrong. The PDF must be printed at exactly 100% scale — not "fit to page," not "shrink to printable area." Every reputable template has a reference dimension or scale ruler printed on the page; check it with a metal rule before you cut anything. If the printed scale is off by even 5%, your fitment check is meaningless.
A printed paper template is too flimsy to position accurately inside the wheel. Cut the template out roughly first, then glue it to a piece of corrugated cardboard or stiff cardstock and cut around the profile precisely. Include the caliper outline, the bell, and the rotor in your cut-out. The rigid backing lets you stand the template up vertically inside the wheel without it folding over.
Hold the template against the back of the wheel with the bell-center marker aligned to one of the lug holes (or to the marked centerpoint on the template). The template stands vertically — perpendicular to the wheel face — so it represents the actual rotated position of the brake assembly inside the wheel.
Walk around the template looking for any place where the caliper outline contacts the inner spokes or the wheel barrel. The two most common failure points: the outboard face of the caliper hitting the back of the spokes, and the top of the caliper hitting the inside of the barrel. If you have contact at any point, the wheel doesn't fit. If you have less than 3mm of visible gap at the tightest point, the wheel is marginal — proceed only if you're prepared to add a small spacer.
Don't just check one position. Rotate the template through several lug positions to verify clearance is consistent — wheel manufacturing tolerances mean spoke spacing isn't always perfectly uniform, and you want to find the worst-case position before you commit.
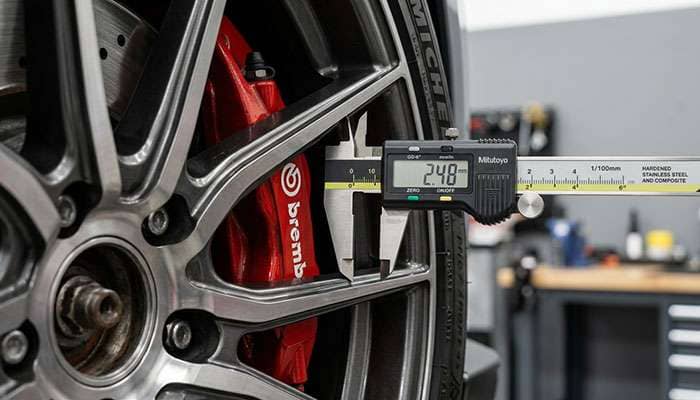
If you have your existing wheels mounted on the car and a brake kit installed, you can measure clearance directly with a digital caliper or a depth micrometer. This is the method to use when you're checking whether your current wheels will work with a new brake kit, or whether new wheels will work with your existing brakes.
Three measurements matter. First, the radial gap: from the outer edge of the rotor or the top of the caliper, straight up to the inside of the wheel barrel. This tells you whether the brake assembly fits inside the wheel diameter at all. Second, the axial gap: from the outboard face of the caliper to the back of the nearest spoke. This is the most common failure point, and the one that gets compressed under cornering load. Third, the tangential gap: across the side of the caliper, looking for any spokes that pass close to the caliper as the wheel rotates.
You can't measure the tangential gap statically with the wheel installed — you need to rotate the wheel by hand a full revolution while watching for contact, listening for scraping, and feeling for any catch. If you've done the math right and the radial and axial gaps are above 3mm, the tangential check is mostly a confirmation. If something contacts during rotation, you've found a worst-case spoke position the static measurement missed.
If your measurement shows interference, you have two paths: add a wheel spacer to push the wheel outward, or buy a different wheel. Each has its place.
Spacers work for axial clearance, not radial. A 5mm hubcentric spacer moves the entire wheel outboard by 5mm, which directly increases the gap between the back of the spokes and the caliper face. That's the most common interference, so spacers solve the most common problem. But a spacer does nothing for radial clearance — if the top of the caliper contacts the inside of the barrel, no amount of spacer will help. That's a wheel-diameter or wheel-design problem, and the only fix is a different wheel.
Spacers introduce their own ripple effects. Adding 5–10mm of spacer width pushes the wheel outboard, which means more fender protrusion, potentially more rubbing on aggressive suspension travel, and a wider track that subtly affects steering geometry. Most performance applications can absorb 3–5mm of spacer without practical consequence. Past that, you're modifying the vehicle's stance and you should plan accordingly. The full pros-and-cons breakdown is covered in our guides on whether wheel spacers hurt your car and the specific benefits of wheel spacers and adapters.
Wheel construction matters when clearance is tight. If you're running close-tolerance fitment, the structural rigidity of the wheel matters — flex under load can cost you a millimeter of clearance you measured statically. Forged and flow-formed wheels are stiffer than cast wheels at the same weight, which is why high-performance applications tend to spec them. Our breakdown of cast vs. forged vs. flow-formed construction covers the engineering tradeoffs.
When to just buy different wheels. If your interference is more than 5mm at any point, if it's a radial barrel-clearance issue, or if it's at multiple contact points around the wheel, stop trying to make a marginal fit work. Buy a wheel that's known to clear your kit. Most reputable wheel retailers — including PPT — can confirm caliper clearance for a specific brake kit before you order. The small additional research time is cheaper than scraped finishes or, worse, a failure on track. If you want to dig into this more broadly, our guide to choosing custom car wheels covers the full fitment-decision process, and our wheel inventory includes detailed spec sheets and known fitments for popular brake kits. The piece on common wheel damage issues also covers what happens when clearance is wrong long-term.
Caliper clearance is a measurement problem, not a guessing problem. The data you need is published — brake manufacturer templates, your wheel's spec sheet, your brake kit's known dimensions — and the tools you need cost less than $30. Spend twenty minutes per corner with a printed template and a digital caliper before you commit to a wheel order, and you'll know with certainty whether your fitment works.
The shortcut everyone wants — "just check if the diameter fits the rotor" — gives the wrong answer roughly half the time. Two wheels with identical published specs can yield very different real-world fitments because spoke profile, barrel shape, and caliper geometry interact in ways that aren't on the spec sheet. Measure the actual hardware, hold a 3mm minimum (5mm for track), and verify before you order. That's the work that separates a clean install from a $2,000 lesson.
Diameter, width, offset, and bolt pattern transfer across wheels — but spoke design and barrel profile don't, and those are often what decide caliper fit. An aftermarket wheel matching all your factory specs can still interfere with the caliper if the spoke geometry is different. Always verify with a template or direct measurement before committing.
Most performance applications absorb 3–5mm of hubcentric spacer with no practical consequences. Past 5mm, you're modifying the effective offset of the wheel and need to confirm fender clearance through full suspension travel and steering lock. Past 10mm, you're approaching territory where wheel studs may need to be replaced with longer ones to maintain proper thread engagement, and the changes to track width start affecting handling. Use the smallest spacer that achieves the clearance you need.
2mm static clearance is below most manufacturer minimums and is risky for daily driving. Suspension flex under load, thermal expansion of the caliper, and small wheel deflections can compress that gap to zero. For street use, add a 3mm spacer or move to a different wheel. For track use, 2mm is unacceptable — go to 5mm minimum. Marginal fitment is one of the most common causes of cosmetic damage to aftermarket wheels.
Yes, and the answer is often different at each axle. Front brakes are typically larger than rear brakes on most performance vehicles, so the front wheels usually have the tighter clearance. But rear setups can have their own quirks — particularly on vehicles with parking-brake calipers or unusual rear caliper geometry. Run the template check at every corner before ordering, especially if you're running staggered fitment with different front and rear wheel widths.