Wheel offset mistakes can destroy your wheel upgrade dreams. Tires rubbing against suspension parts, brake interference, or fender contact turns premium wheels into expensive problems.
At Performance Plus Tire, we know wheel offset comes down to one critical measurement: the distance between your hub mounting surface and the wheel's centerline. Getting wheel offset right determines how your wheels position relative to your suspension and tires. The difference between positive offset and negative offset impacts everything from ground clearance to steering feel.
Here's what we've learned from years of wheel fitment: keep your new offset within 5 millimeters of your original specification. This simple rule prevents most fitment disasters. We'll guide you through exactly how to achieve perfect wheel fitment every time.
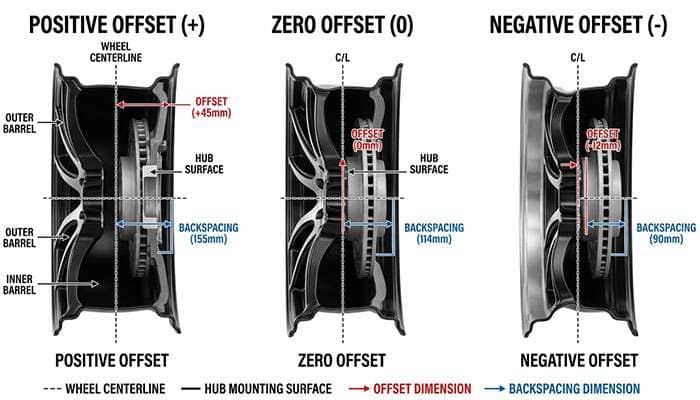
Wheel offset measures the distance between two critical points on your wheel: the hub mounting surface and the wheel's centerline. This specification, measured in millimeters, determines whether your wheels push outward toward the fenders or tuck inward toward the suspension.
The hub mounting surface is the flat area on the back of your wheel where it bolts to your vehicle's hub. Your lug nuts tighten down against this surface to secure the wheel in place. The position of this mounting surface relative to the wheel's centerline creates the offset measurement that affects how your wheels sit in the wheel wells.
The wheel's centerline runs through the exact middle of the wheel's width. Offset determines the relationship between this centerline and where the wheel mounts to your vehicle. When the mounting surface sits closer to the outer edge of the wheel, you have positive offset. This configuration appears on most front-wheel drive cars and newer rear-wheel drive vehicles, tucking the wheel further under the fender.
Negative offset occurs when the mounting surface sits closer to the inner edge of the wheel. Deep dish wheels and wheels for lifted trucks typically feature negative offset, pushing the wheel outward for a wider stance. Zero offset means the mounting surface aligns exactly with the wheel's centerline.
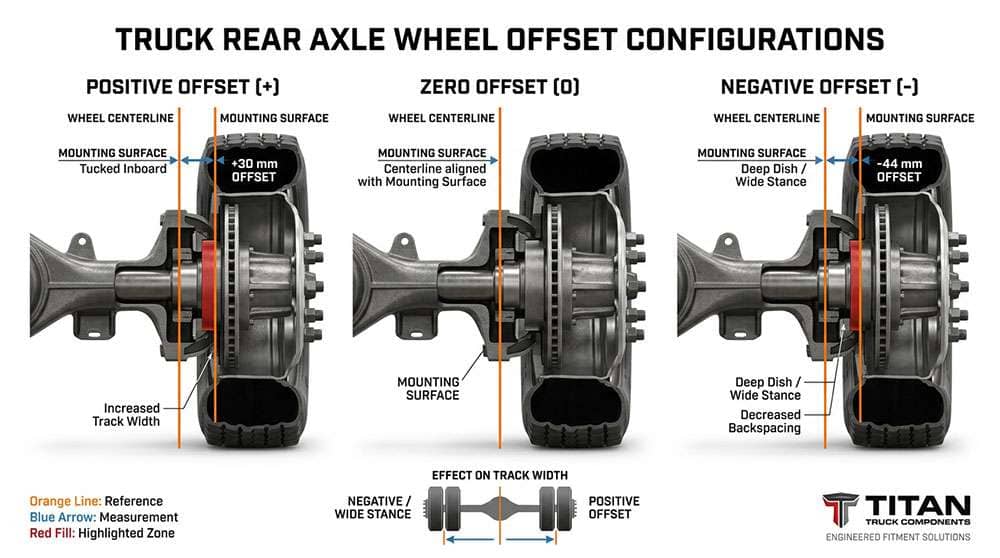
Proper offset maintains safe handling and steering response. The wrong offset can seriously affect your vehicle's handling characteristics. Offset directly impacts your vehicle's track width, which is the space between the left and right wheels on the same axle. Wider track width from negative offset reduces body roll and improves handling on uneven terrain.
Offset changes also affect clearance between your tire and suspension components. Correct backspacing allows enough room for the suspension, brakes and steering systems to operate without interference from the wheel. Different cars have different brake calipers and brake sizes, so wheel spokes may hit brake calipers if the wheel offset is not correct. Negative offset creates lateral forces that act on your wheel's ball joints, control arms, and wheel bearings.
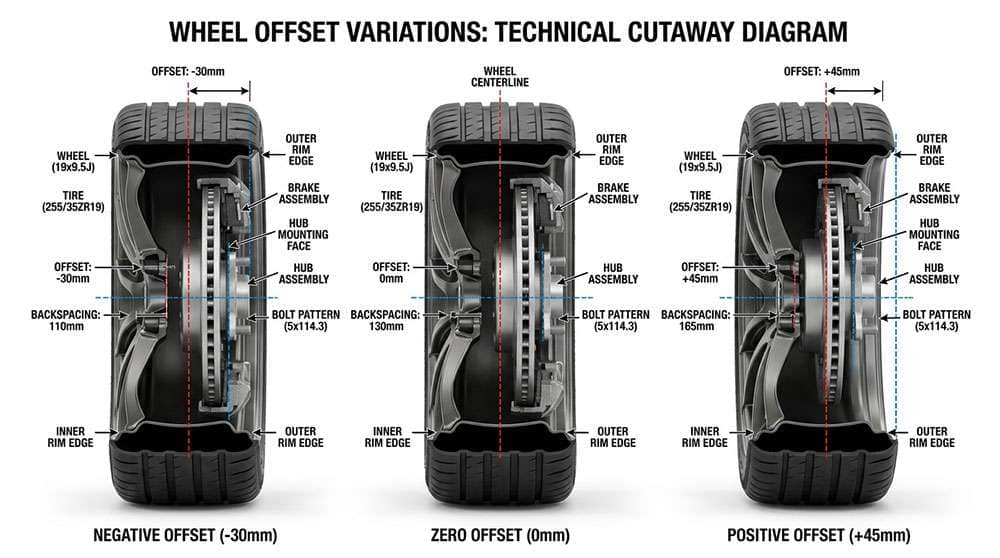
Offset measurements fall into three distinct categories based on where the mounting surface positions relative to the wheel's centerline. Each configuration creates different effects on your vehicle's stance, handling, and appearance.
Positive offset moves the mounting surface toward the street side of the wheel's centerline. This design pulls wheels inward, tucking them closer to your suspension components. Most front-wheel drive vehicles and modern rear-drive cars use positive offset wheels.
The benefits are clear: weight distribution improves and creates a clean, streamlined look with wheels sitting inside the fender wells. High offset wheels like +45 keep wheels tight against the vehicle body, preventing water and debris from splashing along the sides. The downside? Limited design flexibility that can make wheels appear flat with minimal spoke depth.
Negative offset positions the mounting surface toward the brake side of the wheel's centerline. This pushes wheels outward from the vehicle body for a wider, more aggressive stance. Deep dish wheels typically feature negative offset, allowing for dramatic spoke angles and layered designs.
Off-road trucks and performance rear-wheel drive vehicles commonly run this setup. The wider track width improves stability during aggressive cornering or rough terrain driving. However, the trade-off includes increased stress on wheel bearings and suspension components.
Zero offset aligns the mounting surface exactly with the wheel's centerline. This balanced approach distributes equal spacing on both the inner and outer wheel sections. Older vehicles, trucks, and utility applications often use zero offset for its straightforward, durable characteristics. The setup reduces stress on ball joints and wheel bearings compared to negative offset configurations.
Backspacing and offset measure the same wheel positioning using different reference points. Backspacing calculates the distance from the mounting surface to the wheel's inner edge in inches. Offset measures from the mounting surface to the centerline in millimeters. Positive offset increases backspacing, while negative offset reduces it.
Accurate offset measurement saves you from costly fitment mistakes. You can determine this critical specification at home using basic tools and simple calculations.
Gather these essential items: tape measure with millimeter markings, straight edge (level or metal ruler), calculator, and a clean wheel without tire mounted. Measuring without a tire gives you the most precise reading.
Start by placing your wheel flat on a clean surface. Measure from the outer edge of one rim flange to the opposite flange edge. Record this width in millimeters, then divide by two to find the centerline. An 8-inch (203mm) wheel has its centerline at 101.5mm.
Next, flip the wheel so the back side faces up. Place your straight edge across the inboard flange and measure down to the hub mounting surface. This measurement is your backspacing. Calculate offset using this simple formula: Offset = Backspacing - Centerline. Positive offset results when backspacing exceeds centerline. Remember to convert inches to millimeters by multiplying by 25.4.
Add 1 inch to rim width, divide by 2, then convert offset from millimeters to inches by dividing by 25.4. For positive offset, add this converted number to the centerline. For negative offset, subtract it.
Most manufacturers stamp offset values on the wheel back. Look for "ET" followed by a number (like ET7) or simply +7 for positive offset and -7 for negative. This marking eliminates guesswork and confirms your measurements.
Wrong offset choices create fitment nightmares that damage your vehicle and waste your money. We see these problems regularly, and they're all preventable with proper planning.
Excessive positive offset forces wheels too far inward, creating contact between tire sidewalls and fender liners during turns. Wheels can strike struts, control arms, or brake calipers when suspension compresses. This leads to tire blowouts, suspension damage, and expensive repairs. Your suspension loses its ability to articulate properly over bumps and dips.
Aggressive negative offset pushes wheels beyond your fenders, turning your vehicle into a dirt and debris magnet. The increased stress destroys wheel bearings, ball joints, and control arm bushings faster than normal. Steering effort increases while precision decreases, making your vehicle harder to control. You may need fender flares or modifications to prevent tire contact.
Inner clearance keeps tires away from suspension components and brake calipers. Brake caliper sizes vary between vehicles, so what fits one car won't necessarily fit another. Outer clearance prevents tire contact with fenders during steering and suspension travel. Check both measurements before purchasing.
We recommend these guidelines based on factory specifications: 0-5mm difference stays safe for most applications, 6-10mm typically works with proper clearance verification, while changes over 10mm risk interference and handling problems.
Contact wheel fitment experts when your offset exceeds 5mm from factory specifications, when installing wider wheels than original equipment, or when combining wheel changes with suspension modifications. Professional measurement saves money and prevents damage.
Proper wheel offset makes the difference between a successful upgrade and expensive problems. With the knowledge we've shared, you can select wheels that fit perfectly and perform as intended.
At Performance Plus Tire, we've guided thousands of customers through wheel fitment decisions. The most successful upgrades happen when you measure carefully, verify clearances, and stick to proven guidelines. Getting offset right the first time prevents rubbing issues, suspension damage, and costly returns.
Our experienced team stands ready to help you navigate wheel specifications and ensure perfect fitment for your vehicle. Whether you're upgrading for performance or style, proper offset selection protects your investment and delivers the results you want.
Ready to upgrade your ride? Contact Performance Plus Tire today and let our fitment experts help you choose wheels that look great and perform flawlessly.
Understanding wheel offset is crucial for safe vehicle performance and proper wheel fitment. Here are the essential insights every car owner should know:
• Wheel offset measures the distance between the hub mounting surface and wheel centerline - this specification determines how wheels position relative to your suspension and fenders.
• Stay within 5mm of factory offset specifications - exceeding this range risks tire rubbing, suspension interference, and compromised handling performance.
• Positive offset tucks wheels inward while negative offset pushes them outward - each affects vehicle stance, clearance, and stress on suspension components differently.
• Measure offset accurately using wheel width, backspacing, and centerline calculations - proper measurement prevents costly fitment mistakes and ensures safe installation.
• Check both inner and outer clearances before purchasing - verify space between tires and suspension components, brake calipers, and fender wells to avoid interference issues.
Getting wheel offset right the first time protects your investment and ensures optimal vehicle performance. When in doubt, consult professionals for offset changes exceeding factory specifications or when combining with suspension modifications.
Q1. How do I determine the correct wheel offset for my vehicle? To find the right wheel offset, measure the distance from your wheel's center point to where it mounts on the hub. Add this offset measurement to half your wheel's width to calculate backspace, and subtract it to find front space. Compare these measurements to your wheel well dimensions to ensure proper fitment. Staying within 5mm of your factory offset specifications is the safest approach.
Q2. What happens if I choose the wrong wheel offset? Incorrect wheel offset can cause serious problems including tire rubbing against fenders or suspension components, brake caliper interference, and compromised handling. Too much positive offset pulls wheels inward causing contact with struts and control arms, while excessive negative offset pushes wheels outward, increasing stress on wheel bearings and ball joints. Both scenarios can lead to premature wear and safety issues.
Q3. How does negative offset differ from positive offset? Negative offset positions the mounting surface closer to the brake side of the wheel, pushing the wheel outward for a wider stance. Positive offset places the mounting surface toward the street side, tucking the wheel inward closer to the suspension. Zero offset aligns the mounting surface exactly with the wheel's centerline, creating equal spacing on both sides.
Q4. Can I measure wheel offset myself at home? Yes, you can measure wheel offset with basic tools including a tape measure with millimeter markings and a straight edge. Measure the total wheel width, divide by two to find the centerline, then measure from the mounting surface to the back edge (backspacing). Subtract the centerline from backspacing to calculate offset. The measurement is most accurate when done on a wheel without a tire mounted.
Q5. When should I consult a professional about wheel offset? Seek expert advice when your new offset exceeds 5mm from factory specifications, when fitting wheels wider than original equipment, or when combining offset changes with suspension modifications. Professionals can verify clearances with brake calipers, suspension components, and fenders to prevent fitment issues and ensure safe installation.