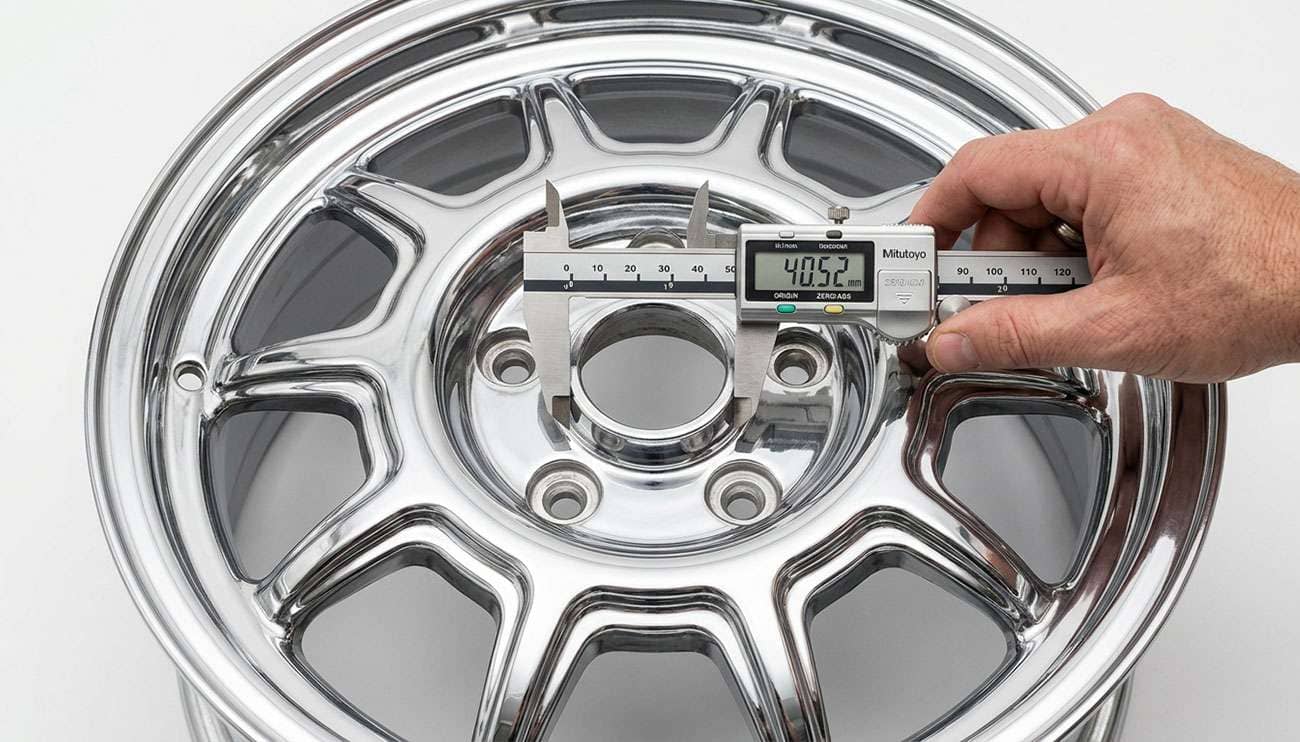
You find your center cap size by measuring the spot where the cap actually grabs the wheel, not the wheel itself. Running 15-inch wheels tells you almost nothing. A snap-in cap sizes to the opening on the wheel face. A snap-on steel wheel cap sizes across the little retention bumps stamped into the wheel. A press-in cap sizes to a machined bore, down to the hundredth of an inch. A bolt-on cap sizes to its screw circle or your bolt pattern. Find the grab point first. Then measure that, and only that.
You'll hear "it depends on your wheel" from just about everybody. It depends on one thing: how the cap holds on. Know that, and you know exactly where to put the tape measure.
I've been fitting caps in Long Beach since 1971, and the most common mistake hasn't changed in all that time. A guy walks in with a 15-inch wheel under one arm and a "15-inch" cap under the other, and the two have never met. Most guides stop at "measure the center bore." Here's the part nobody puts in front of you: on a lot of classic steel wheels, the cap never touches the bore at all. It grabs bumps pressed into the wheel face seven to eleven inches across.
Start with this table. Find how your cap holds on, and it tells you what to measure.
Retention Type |
Where It Grabs the Wheel |
What You Measure |
Best Tool |
|---|---|---|---|
Snap-on (steel wheel nubs) |
Raised bumps stamped into the wheel face |
Outside edges of the nubs, straight across (or calculated on 3-nub wheels) |
Steel rule or tape, read to 1/16 inch |
Snap-in (spring clips) |
A lip or groove inside the cap opening on the wheel face |
Opening diameter on the face, plus clip-to-clip span on the old cap |
Dial or digital caliper |
Press-in (O-ring) |
Friction against a machined bore |
Bore diameter to 0.01 inch, plus cap height |
Digital caliper |
Push-through |
A flange clamped between the wheel and the hub |
Center bore, barrel diameter, and cap height |
Digital caliper |
Bolt-on (screws) |
Threaded holes in the wheel face |
Number of screws, screw-circle diameter, cap diameter |
Caliper and steel rule |
Retainer plate |
A plate and screws installed from behind the wheel |
Center hole diameter on the wheel face |
Caliper |
Lug-mounted (spider) |
A mounting plate clamped under the lug nuts |
Bolt pattern |
Bolt pattern gauge or steel rule |
Knock-off or spinner |
Threads onto an adapter on the wheel |
Wheel model and adapter thread; hat diameter only for looks |
The wheel's part number |
The measurement that decides cap size is the diameter of the retention point: the exact circle where the cap locks onto the wheel. Get that wrong and the prettiest cap in the world either never goes on or ends up in the gutter.
Wheel diameter is measured at the bead seat, where the tire sits. The cap lives in the center section, and that's designed separately. That's why one 15-inch steel wheel takes a 7-inch Rallye cap, another takes a 7-1/2-inch smoothie cap, and a third takes a dog dish over 10 inches across. Same rim size, three caps, none of them interchangeable.
It works the other way, too. Chevy kept the Rallye wheel's center at 7 inches from 1967 all the way through 1982, so a cap off a '67 Camaro snaps right onto a '78 Corvette wheel. The center got standardized, not the rim.
Your wheel has a center bore on the back that slips over the hub, and many wheels have a separate cap opening on the front face. They aren't always the same diameter, and they don't do the same job. The bore locates the wheel on the car. The opening holds the cap. For the full story on the bore itself, see our wheel center bore guide.
On a press-in or push-through cap, the bore really is the number that matters. On a snap-on steel wheel cap, it's irrelevant.
If you know what wheel you have, this table gets you most of the way there. It's keyed by wheel family, because that's how caps are actually built and sold: to fit a specific wheel, not a specific car.
Wheel Family |
Retention |
The Number That Matters |
Watch Out For |
|---|---|---|---|
Chevy Rallye (1967-1982) |
Snap-in |
7-inch center, same across wheel sizes |
Bulged lug nuts can hit the cap retainer ring |
Smoothie steel, 14 and 15-inch |
Snap-on |
7-1/2-inch cap |
Some larger smoothie series use a Rallye-style center instead |
Solid, Gennie, and hot rod steel ('40-'48 Ford style) |
Snap-on |
About 8-1/8 to 8-1/4 inches |
Exact size varies by wheel maker |
Artillery steel |
Snap-on |
Matches smoothie or Gennie sizing, depending on the maker |
Caps are often marked for artillery wheels only |
OE Ford, GM, and Mopar steel (dog dish) |
Snap-on |
About 8-3/4 to 10-7/8 inches across the nubs |
3-nub wheels can't be measured straight across |
Magnum 500 (Ford and Mopar) |
Retainer plate |
Center hole, 2-1/8 inches on many wheels |
Not every Magnum 500 uses the same hole size |
Pontiac Rally II |
Spring clip (OE) or retainer plate (reproduction) |
Model year: '67-'70 versus '71-up centers |
Early caps and late caps are not interchangeable |
Mopar Rallye |
Snap-in with retainer |
Bolt circle: 5 x 4 versus 5 x 4-1/2 |
Early and late caps differ |
Torq Thrust, Salt Flat, Hopster |
Five-ear bolt-on |
Wheel model; five Allen screws |
Hollow-point and flat caps use different screws |
Spider caps on steel wheels |
Lug-mounted |
Bolt pattern: 5 x 4-1/2, 5 x 4-3/4, 5 x 5, or 5 x 5-1/2 |
The plate must sit flat under the lug nuts |
Billet aftermarket wheels |
O-ring, push-through, snap-on, or bolt-on |
Published cap diameter, often 2-7/8 inches on exposed-lug designs |
One brand may use all four systems across its lineup |
You measure a snap-in center cap at the opening on the wheel face with a caliper, then confirm it against the clip span on your old cap. Snap-style caps come in two flavors that get lumped together all the time: caps that snap into an opening, and caps that snap over bumps on a steel wheel. They measure completely differently.
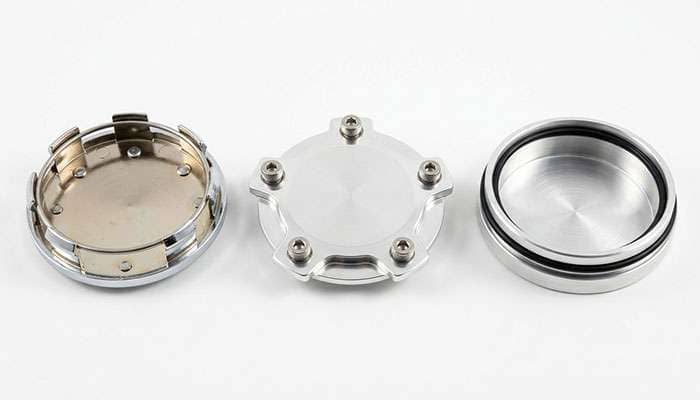
A snap-in cap has spring clips or flexible tabs on the back. Push it in, and the tabs fold inward as they pass through the opening, then spring back out behind a lip or into a groove. The Chevy Rallye works this way, and so do most factory alloy wheels and plenty of aftermarket ones.
The mechanism explains why the fit window is so narrow. The clips only hold if they stay slightly compressed when the cap is seated. Too small an opening and the clips can't fold far enough, so you crack a tab forcing it. Too big and the clips never load up, so the cap sits there loose, waiting for the first pothole.
Take two numbers. Put the caliper jaws inside the opening on the wheel face and read the diameter, rocking the caliper slightly and keeping the largest reading, since you only hit the true diameter dead center. Then, if you have an old cap, measure across its two farthest clips, tip to tip. That clip span should run a hair bigger than the opening. That's the preload that holds the cap in.
Then check depth. Measure how far the clips stick out, and how much room you have behind the opening before the cap hits the hub or axle flange. Front wheels are where this goes wrong. The rear axle flange is flat, but the front spindle has a dust cap sticking out of it, and a shallow cap that seats perfectly on the rear can bottom out on the front.
Dog dish caps, baby moons, and smoothie caps don't go into a hole at all. Look at a factory steel wheel and you'll see three or four raised bumps stamped in a circle around the center. The cap's rolled inner lip snaps over the outside edges of those bumps, so that's your measurement: the circle made by the outside edges of the nubs.
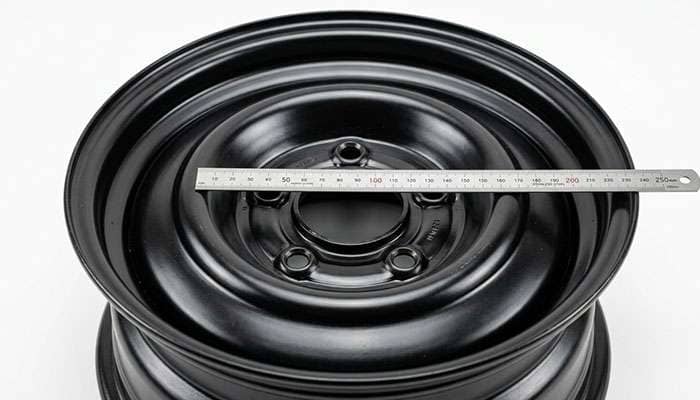
On a 4-nub wheel, lay a steel rule across two opposite nubs and read outside edge to outside edge, to the nearest 1/16 inch. On a 3-nub wheel, no nub sits opposite another, so measure from the outside edge of one nub to the outside edge of the next and multiply by 1.155. Three evenly spaced nubs sit 120 degrees apart, and the straight line between two of them is always about 86.6 percent of the full diameter. An 8-3/4-inch nub-to-nub reading works out to about 10-1/8 inches.
Precision matters because these sizes cluster tight. Passenger car caps run from roughly 8-3/4 to about 10-7/8 inches with several stops in between, and 8-lug truck wheels jump to around 11-5/8 to 11-3/4. Two sizes 3/8 inch apart look identical on a parts counter, and only one of them stays on at 60 mph.
This detail saves you a return. The same cap face is often built in more than one size for different wheel series. Wheel Vintiques, for example, builds its '52 Chevy cap in one version for their 14- and 15-inch smoothie wheels and another for Rallye-style wheels and their larger smoothie series. Same emblem, different back side. Order by the picture and it's a coin flip. Order by the wheel it fits and it's the right cap. If you're still picking a look for your steelies, our guide to smoothie wheels and baby moons walks through the styles.
You measure a bolt-on center cap by its fastener layout: how many screws, how far apart, and what they thread into. A cap that's 1/8 inch off on its screw circle won't line up with a single hole. These are the most secure caps going, which is why I steer folks who drive their cars toward them, and the least interchangeable.
American Racing's Torq Thrust, Salt Flat, and Hopster wheels use a five-ear cap: five tabs around the edge, each taking a small stainless Allen screw into the wheel face. If you've read our Torq Thrust review, you know that wheel and that cap system go way back.
For any screw-mounted cap, count the screws, measure the screw-hole circle center to center, and measure the cap's outside diameter. With exposed lug nuts, that diameter has to fit inside the lug circle with room for a socket. And don't mix hardware. American Racing's hollow-point and flat caps use different screws than their standard dome caps.
Some caps bolt on from behind. On Ford and Mopar Magnum 500 wheels, the cap goes through the center hole from the front, and a retainer plate with screws locks it in from the back. That's why Magnum 500 caps are sold by center hole size. 2-1/8 inches is the one you'll see most, but not every Magnum 500 uses it, so measure first.
Pontiac's Rally II shows how a cap can change while the wheel looks the same. The originals were held by a spring, and many reproductions use a retainer plate from behind instead. Pontiac also changed the center opening around 1971, so caps split into '67-'70 and '71-up versions. Mopar Rallye caps split by bolt circle: a cap for a 5 x 4 Rallye won't fit a 5 x 4-1/2 Rallye, and early and late caps aren't the same part either.
Spider caps barely care about the wheel. A mounting plate slips over your lug studs, the lug nuts clamp it down, and the decorative cap attaches to the plate, covering both the hub and the nuts. So a spider cap is sized by bolt pattern, period: 5 x 4-1/2 for Ford, 5 x 4-3/4 for most Chevy passenger cars, 5 x 5 and 5 x 5-1/2 for the bigger stuff. Not sure what you've got? Our guide on how to measure a bolt pattern takes about two minutes.
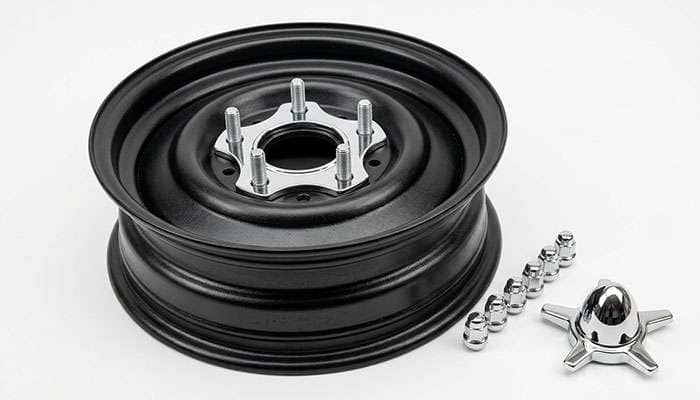
Here's the catch. That plate sits in the clamp load of your lug nuts. If it doesn't lie dead flat, or your nuts don't seat properly through it, you've changed how the wheel is held to the car. Make sure your nuts match the seat the plate was designed for. Our breakdown of lug nut seat types applies double when there's a plate in the stack.
Knock-offs and three-bar spinners thread onto an adapter that's matched to the wheel, so you size them by the wheel's make and model, not with a tape measure. Our own Hot Rod Hanks wire wheels take caps built for those wheels and nothing else, and that's typical for wire wheels. The hat diameter is a looks decision. Billet Specialties' large Legacy knock-offs, for instance, run 6-15/16 inches across and go on hand tight. For the full story on wire wheel hardware, see our wire wheels and knock-offs guide.
Ever wonder why spinners vanished from new cars for a generation? NHTSA's Federal Motor Vehicle Safety Standard No. 211 took effect January 1, 1968, banning winged projections on wheel nuts, wheel discs, and hub caps on passenger cars because they could catch pedestrians and cyclists. NHTSA rescinded FMVSS 211 effective June 5, 1996, and has since said no federal standard covers hubcaps or wheel covers at all. That's part of why cap sizing is a free-for-all. Nobody tells manufacturers how big to make the hole.
You measure a press-in center cap with a digital caliper, right in the bore it presses into, read to the hundredth of an inch. Press-in caps have no clips and no screws. Friction alone holds them, from an O-ring or from a barrel sized just over the bore. That makes them clean and simple to install, and less forgiving to measure than any other style.
The O-ring sits in a groove around the cap's barrel and squeezes against the bore when you press the cap in. Everything depends on that squeeze. A bore a few hundredths too large leaves the ring barely touching, and the cap works loose. Too small, and you tear the ring going in. That's why billet wheel makers list O-ring caps by exact outside diameter, like 3.0 or 3.3 inches, instead of by wheel size.
Measure the bore at its smallest point, where the ring will ride, and measure your old cap's barrel across the O-ring. If the old cap kept falling out, check the ring before you blame the size. Rubber takes a set and hardens over time, and a fresh O-ring often fixes the whole problem.
A push-through cap goes in from the back of the wheel before the wheel goes on the car. The barrel pokes out the front, and a flange on the back gets sandwiched between wheel and hub when you tighten the lug nuts. You'll find them on lots of steel and billet wheels and on most trailer wheels.
Here, "measure the center bore" is exactly right. Take three readings: bore diameter, barrel outside diameter, and the barrel height needed to clear the hub and sit proud of the face. The flange lives in the joint between wheel and hub, so it has to be thin and flat. Anything that keeps the wheel from seating flush is a safety problem, not a cosmetic one.
Don't assume a brand uses one cap style. Billet Specialties alone sells O-ring, push-through, snap-on, and bolt-on caps, with exposed-lug caps commonly 2-7/8 inches and other series running up to 7 inches. The brand gets you close. The series and the measurement get you there.
You find a cap for a mystery wheel by identifying the wheel first, then measuring the retention point to confirm. Swap meet wheels and project car wheels are half the cap questions we get. Here's the order I work in.
If you have even one cap left, flip it over. Most carry a part number or maker's mark, and that number beats any measurement because it names the exact cap. Write it down before you clean the cap, since degreaser can wipe faint markings right off.
No cap? Pull the wheel and check the back of the center section and the inside of the spokes. Aftermarket wheels usually have the brand and series cast or stamped in. Factory steel wheels may carry part numbers near the valve stem or center. Even a partial number narrows it down fast.
Then read the face. Bumps stamped in a circle mean snap-on. A round opening with a lip inside means snap-in, while smooth, machined walls point to an O-ring cap. Small threaded holes around the opening mean bolt-on. A plain hole with a plate behind it means a retainer. Then go back to the first table and measure the one spot that matters.
No, center caps are not universal, because nothing says they have to be. With FMVSS 211 gone since 1996, NHTSA doesn't regulate hubcaps or wheel covers, and there's no common sizing standard. Every wheel maker designs its own center section and retention method.
What you will find are caps that are universal within a family. The Chevy Rallye center stayed the same from 1967 to 1982, and many OE steel wheels share a handful of nub diameters. Spider caps cross brands freely because they key off the bolt pattern, which is as close to universal as caps get.
If you're weighing a cap against a trim ring or a full wheel cover and the terms are fuzzy, our rundown of center caps, trim rings, and beauty rings sorts them out.
A center cap is a small part, but a wrong one costs you in steps, and each step costs more than the last. Here's how it usually goes when the size is close but not right.
Every one of those steps ends the same way: you buy a cap. The only question is whether you buy it once, measured right, or twice.
Here's the whole process the way I'd walk you through it at the counter. Give it fifteen minutes and you'll order the right part the first time.
Sizing a center cap isn't hard once you stop measuring the wheel and start measuring the grab point. Figure out how your cap holds on, measure that one spot with the right tool, and match it to a cap made for your wheel series.
And if you're standing in the garage with a mystery wheel and a tape measure and it still isn't adding up, give us a call. We've been sorting out caps for collector cars, hot rods, and daily drivers since 1971, and odds are we've seen your wheel before.
No. Each wheel maker designs its own center section and retention method, and no federal standard sets cap dimensions. Some caps are shared within a wheel family, like Chevy Rallye wheels from 1967 to 1982, and spider caps cross brands by bolt pattern, but most caps fit specific wheel series only.
Not really. Wheel size is measured at the bead seat, while the cap fits the center section, which is designed separately. Two 15-inch steel wheels can take caps 7 inches and 10 inches across. Size the cap by where it grabs the wheel and by the wheel series it was built for.
Only for some caps. Press-in and push-through caps fit the bore, so the bore is the critical measurement. Snap-on steel wheel caps grab nubs on the wheel face and never touch the bore, and many snap-in caps fit a front-face opening that differs from the hub bore on the back.
Measure the wheel, not the cap. Lay a steel rule across the outside edges of two opposite retention nubs on the wheel face and read to the nearest 1/16 inch. On a 3-nub wheel, measure from one nub's outside edge to the next and multiply by 1.155 to get the diameter the cap must fit.
On most cars, yes. Center caps are mainly cosmetic, and the wheel bearing has its own seal and dust cap. Without a cap, dirt and water collect around the hub and lug studs. The exception is caps whose hardware sits under the lug nuts, like spider plates; those must be installed correctly or removed completely.
Usually it's a size mismatch at the retention point, tired clips, or a hardened O-ring. Check the opening or nub diameter against the cap's spec, inspect the clips for cracks or flattening, and replace worn O-rings. If the cap was made for a different wheel series, no amount of pressing will keep it in.