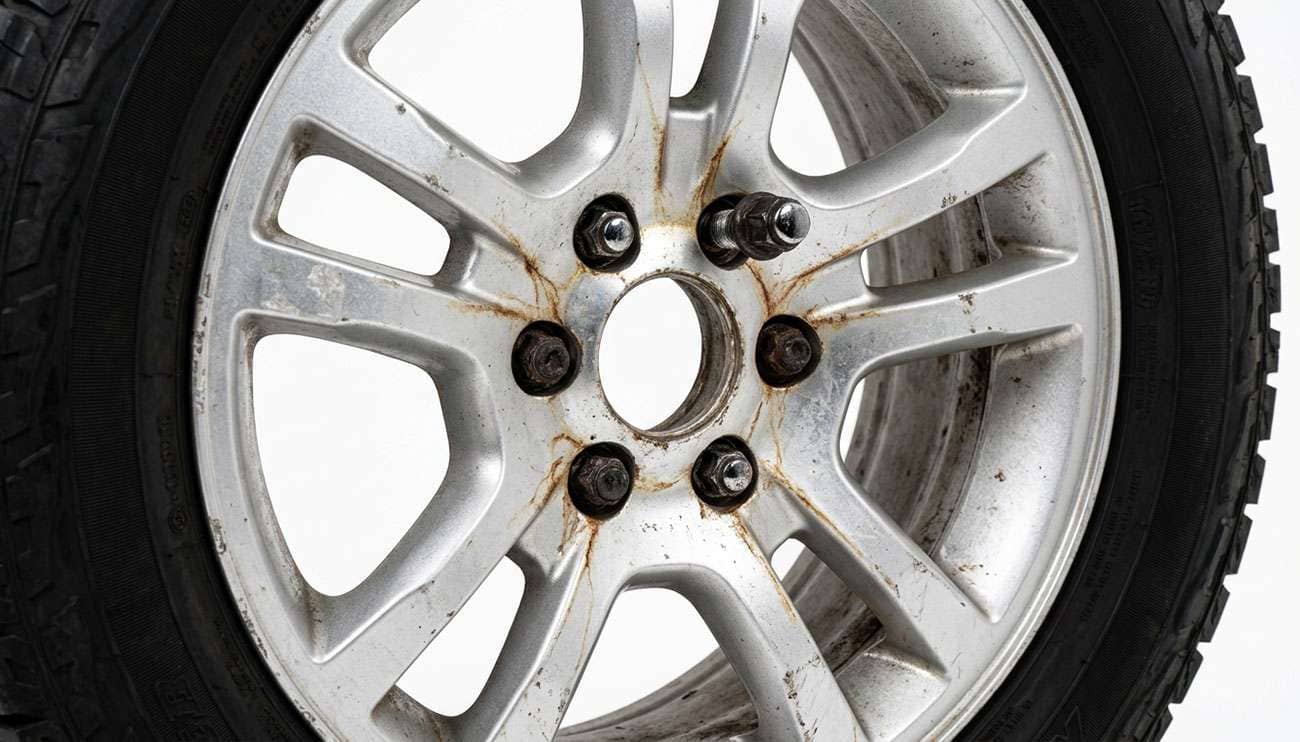
Let me get the important part out of the way first, because people treat this like a nuisance and it is not one. A lug nut that keeps backing off is the early stage of a wheel coming off the car. Not a squeak, not a rattle. A wheel-off event at speed, which is about as bad a day as you can have on the road. So if you are reading this because you found one finger-tight in the driveway, take it seriously and do not just snug it up and go to work.
Now the part that actually solves it. There is a sentence you will read everywhere on this subject: lug nuts vibrate loose. That is not really true, and believing it sends people off buying thread locker and lock washers for a problem those things do not fix.
Properly clamped lug nuts do not vibrate loose. What happens is that the joint loses clamp load first, for some specific reason, and only then can vibration walk the nut off. Loosening is the symptom. Losing clamp load is the disease. Once you look at it that way, every cause on the list falls into place, and so does the fix.
Two questions sort this fast. When did it start, and is it one corner or several? Find your row.
The Pattern |
What It Points At |
Where to Look First |
|---|---|---|
Loosened within a few hundred miles of a tire rotation, tire change, or brake job. One or more wheels. |
Installation. Torque was wrong, uneven, or the surfaces were dirty. |
Mating surfaces, torque procedure, and whether anyone re-torqued it |
Same corner, over and over, even after being properly retightened |
Damaged hardware. Stretched studs or wallowed threads. |
Studs and nuts on that corner, and the wheel's lug holes |
Started when a new set of wheels went on, and will not settle down |
Fitment. Wrong seat type, not enough thread, or the wheel is not centering. |
Lug nut seat shape, thread engagement, hub bore and rings |
Every corner is backing off a little, no recent service |
Nobody has checked them in years, or spacers are involved |
Torque all four to spec, then inspect any spacers or adapters |
One nut, once, and never again after retorquing |
Probably one nut that got missed |
Torque all of them, re-check at 50 miles, then move on |
Those top three rows are genuinely different problems with different fixes, which is why "why do lug nuts come loose" has never had one good answer. The rest of this article works through them in order.
Worth two minutes, because everything else depends on it.
Most people picture the studs as pins passing through the wheel, holding it in place by brute strength. They are not doing that job, or at least they should not be. In a properly assembled wheel, the studs are hardly loaded sideways at all.
What actually happens when you torque a lug nut is that you stretch the stud. A wheel stud is a very stiff spring. Bring it up to spec and you elongate it a few thousandths of an inch, and it pulls back with several thousand pounds of force. That force squeezes the wheel against the hub face, and the friction between those two clamped surfaces is what carries your braking, your cornering, and every pothole you hit. The stud's job is to supply the squeeze. It is a clamp, not a peg.
That stored tension is what people mean by clamp load, and here is the consequence. If anything lets that clamped stack settle even a few thousandths after you torque it, you lose a big chunk of the tension, because the stud only stretched a few thousandths in the first place. Crush a little rust scale, flatten a bit of paint, let a mismatched seat deform, and the stud relaxes. Now the joint is soft, the wheel can move a hair against the hub on every corner, and that movement is what backs the nut off.
So when somebody tells you the nuts vibrated loose, ask what let go of the clamp load first. There is always an answer. Our rundown on what wheel fasteners actually do goes deeper on the hardware itself.
This is the most common case by a wide margin, and it is almost always something that happened on the lift.
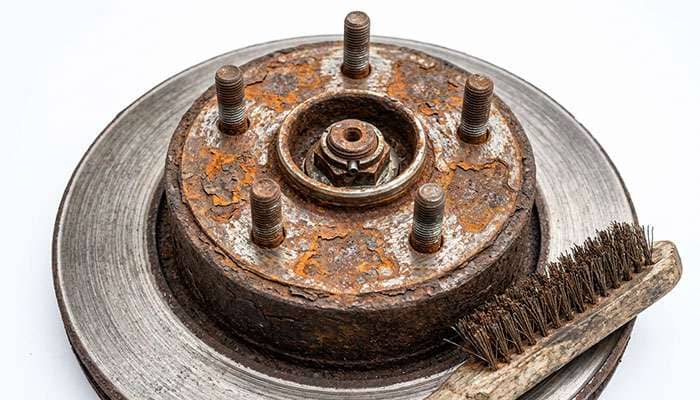
Dirty mating surfaces. The number one offender. Rust scale, flaking paint, and dried mud between the back of the wheel and the hub face. It feels solid when you torque it because that debris is holding the wheel apart. Then you drive twenty miles, the debris crushes and works out, the stack settles, and the clamp load is gone. A wire brush on the hub face takes thirty seconds. Plenty of shops skip it. If you are having this done, ask them to clean it.
Impact gun instead of a torque wrench. An impact gun does not know when to stop. Run one on a stud and you can blow well past spec and stretch the stud past its yield point, which means it does not spring back. A stud that has been yielded cannot hold proper tension again no matter how carefully you torque it afterward, and it will keep loosening until it is replaced. Torque sticks help, but they are approximate, they vary with air pressure and how long the trigger is held, and they are not a torque wrench.
Wrong sequence. Nuts have to go down in a star pattern, in stages, so the wheel pulls up square to the hub. Going around the circle in order can cock the wheel slightly, and a wheel sitting cocked will settle flat later and drop clamp load when it does. Our guide on how to tighten lug nuts properly covers the sequence in detail.
Nobody re-torqued it. Even a clean, correct installation settles a little in the first 50 to 100 miles. That is why every serious shop and every manufacturer tells you to come back and have them re-checked, and why almost nobody does. If you have new wheels, or any wheel that has been off, put a reminder on your phone. Ten minutes with a torque wrench at the 50-mile mark is the cheapest insurance in this entire article.
When one specific wheel keeps doing it and the other three behave, stop retightening and start replacing. Something on that corner is damaged.
Stretched studs. Covered above, and it is the usual answer. Once a stud has been pulled past yield, it has permanently lengthened and lost its spring. You can torque it to spec on the wrench and still not have real clamp load in the joint. A stretched stud often gives itself away when the nut spins on with noticeably less resistance than the others, or when the threads look shiny and slightly drawn out compared to a neighbor.
Damaged threads. Cross-threading, corrosion, or somebody running a nut down with a gun at an angle. Damaged threads bind, which fools you into reading a torque number that is mostly friction rather than tension. The wrench clicks, the joint is barely clamped. Run a nut down by hand on each stud; it should turn freely with your fingers for most of its travel. Any that fights you is suspect.
Elongated lug holes in the wheel. Once a wheel has been driven loose, the seats and holes get hammered oval. That is a wheel problem and no hardware fixes it. More on that further down.
Spacers or adapters. Every spacer doubles the number of clamped joints at that corner, and each one has its own surfaces to keep clean and its own torque to maintain. Done right they are fine. Done casually they are a recurring loosening problem, and it is worth reading whether wheel spacers hurt your car before you decide to keep them.
New wheels and a loosening problem showing up together is not a coincidence. Three fitment issues cause it, and the first one is the big one.
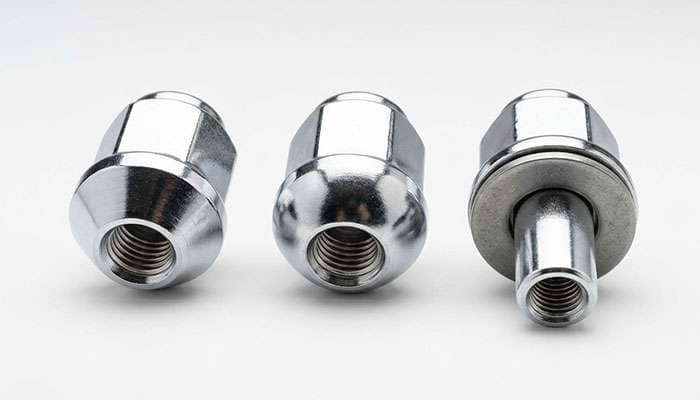
Wrong seat type. The bottom of a lug nut is shaped to match the lug hole in the wheel, and there are three common shapes. Conical, also called acorn, is a 60-degree taper and by far the most common on aftermarket wheels. Ball or radius seat is rounded, used by VW, Audi, and some Hondas. Mag or shank seat is flat with a separate washer and a straight shank that reaches down into the hole, found on some older Toyotas and Hondas and on a lot of classic wheels.
Put a conical nut into a ball-seat wheel and it touches on a thin ring instead of across the whole seat. That tiny contact area gets a huge pressure concentration, it deforms and beds in over the first few miles, and the joint goes slack. It will loosen forever. This is the single most common reason a fresh set of aftermarket wheels will not stay tight, and it happens because people reuse their factory nuts on new wheels. Our breakdown of lug nut seat types shows the shapes side by side, and it is worth two minutes before you assume your old nuts will work.
Not enough thread engagement. Thicker aftermarket wheels and any spacer push the nut further out on the stud, leaving fewer threads engaged. The working rule is that engagement should be at least equal to the diameter of the stud, so about half an inch on a 12mm stud, which usually works out to somewhere around six or seven full turns. Short of that, you cannot generate proper clamp load and you are overloading the few threads that are engaged. The fix is longer studs, not longer nuts.
The wheel is not centering. Most modern cars are hub-centric, meaning the wheel is located by a machined register on the hub, not by the lug nuts. Aftermarket wheels often come with an oversized bore to fit multiple vehicles, and they need a hub ring to fill the gap. Without one, the wheel is centered only by the taper of the nuts, which works until the first pothole shifts it. Then the seats scrub, the clamp load drops, and the nuts start walking. Read up on hub-centric versus lug-centric wheels to find out which yours are.
Somebody is going to tell you to put anti-seize on the threads so this stops happening. You will read it in forums and, I have noticed, in a few articles on this exact topic. I want to explain why the shop answer is no.
A torque wrench does not measure clamp load. It measures the effort it takes to turn the nut, and most of that effort is friction, in the threads and under the seat. The torque number your manufacturer publishes assumes a particular amount of friction, which is why nearly all of them specify clean, dry threads.
Put lubricant on the threads and you drop the friction. Now the same wrench setting drives the nut much further, and you stretch the stud considerably harder than intended. Depending on the lubricant, a spec number for dry threads can over-tension the joint substantially when applied wet. So the guy lubricating his threads to keep the nuts from loosening is quietly stretching his studs past yield, which is the very thing that produces a corner that will not stay tight. He then tightens them harder, and it gets worse.
Same reasoning for thread locker on lug nuts. It is a chemical fix aimed at the symptom, it changes the friction, and it makes the next roadside tire change miserable. If a joint is losing clamp load, find out why. Do not glue it.
Rusty, seized threads are a real problem and I am not pretending otherwise. But the answer there is new studs and nuts, not grease on old ones. A light film of anti-seize on the hub's center register, where the wheel can rust onto the hub, is a different matter and generally fine. On the threads and seats, keep it clean and dry unless your manufacturer specifically says otherwise.
A loose wheel talks to you first. Learn the tells.
If you are already at wobble, you are late. And if a wheel has actually been driven loose for any distance, do not assume retightening puts it right. Something has been hammered by then. While you are at it, our piece on driving with a missing lug nut covers what happens to the remaining fasteners when the load gets redistributed, which is the same math that applies to a loose one.
In order, and do not skip to the end.
The number itself comes from your owner's manual or the door jamb, and it varies a lot. Passenger cars commonly land somewhere in the 80 to 100 lb-ft neighborhood and trucks run higher, but the only figure that matters is the one for your vehicle.
Studs are cheap. Cheaper than a fender, and a lot cheaper than the alternative. Replace them when any of this is true.
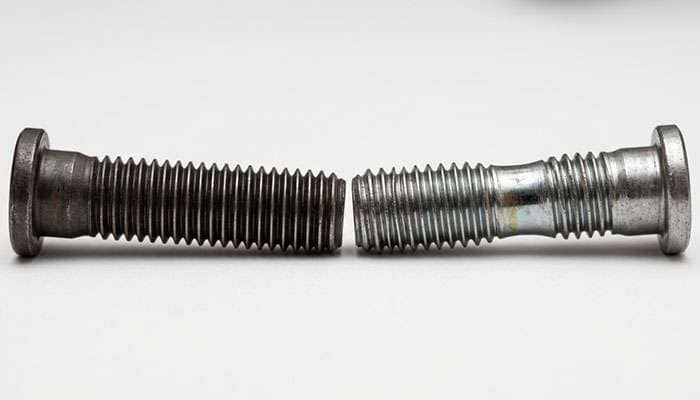
Do the whole corner, not the one bad stud. They have all lived the same life. And replace the nuts with them, because a nut whose seat has been deformed against a mismatched wheel will not seat properly on fresh studs either.
When you buy nuts, match three things: the thread size and pitch, the seat shape your wheels actually need, and enough length to get proper thread engagement. Guessing on any of the three puts you right back at the start of this article.
Hardware |
Coverage |
Price |
|---|---|---|
Full set, matched to your year, make, and model before shipping |
$49.00 |
|
Same set in a black finish for dark wheels |
$49.00 |
Studs themselves are a job for a shop on most modern cars, since the hub usually has to come apart to press them out. It is not expensive work and it is worth doing right.
Sometimes the hardware is not the problem, the wheel is, and no amount of new studs will save it.
Pull the wheel and look straight into the lug holes. A healthy seat is a clean, even taper with a consistent contact ring all the way around. What you do not want to see:
If a wheel has been through a loosening episode and shows any of that, replace it. A wheel is a structural part holding a corner of your car up, and a set of new nuts on a hammered wheel is a repair you will be revisiting. Come see what we have; Performance Plus Tire carries wheels across classic, custom, truck, and off-road, and we will make sure the bolt pattern, hub bore, and seat type all match what your car actually needs so the new set stays tight.
The short version, and it is short on purpose because none of it is complicated.
Clean both mating surfaces to bare metal. Clean, dry threads, no lubricant. Start every nut by hand so you know nothing is cross-threaded. Snug them in a star pattern with the wheel just barely touching down, then lower the car fully and do the real torque in two or three progressive stages, still in a star pattern, with a torque wrench set to your vehicle's number. Do not use an impact gun for the final pass, and do not use your body weight on a breaker bar and call it good.
Then drive 50 miles and check them again. That last step is the one that separates people who have this problem from people who do not. If you want the full walkthrough with the numbers and the stages, we cover it in the mechanic's step-by-step on torquing lug nuts.
Lug nuts do not spontaneously vibrate loose. A properly clamped joint stays clamped. What happens is that something bleeds off the clamp load first, and then the loosening follows. Find what is bleeding it and the problem stops for good.
Sort it by when it started. Right after a service means dirty mating surfaces, an impact gun, a bad sequence, or nobody came back to re-torque. The same corner over and over means the hardware on that corner is damaged and needs replacing, not retightening. Showing up with a new set of wheels means fitment, and nine times out of ten it is the wrong seat shape on reused factory nuts.
Skip the anti-seize and the thread locker. Both change the friction the torque spec assumes and neither addresses the actual cause. Clean metal, correct hardware, a torque wrench, a star pattern, and a re-check at 50 miles will handle almost every case of this you will ever meet.
And if a wheel has been run loose, look hard at the lug holes before you put it back on. That is the one where people get away with it right up until they do not.
What to remember.
Because the joint is losing clamp load, not because vibration is unscrewing them on its own. Torquing a lug nut stretches the stud and that stored tension clamps the wheel to the hub. If rust or paint between the wheel and hub crushes down, if a mismatched nut seat beds in, if the wheel is not centering on the hub, or if the stud has already been stretched past its limit by an impact gun, the tension relaxes and the wheel can shift. Only then does the nut back off. Fix the cause of the lost clamp load and the loosening stops.
No, unless your manufacturer specifically calls for it. Nearly all published torque specs assume clean, dry threads, because a torque wrench measures turning effort and most of that effort is friction. Lubricating the threads reduces friction, so the same wrench setting stretches the stud considerably harder than intended and can pull it past its yield point. That produces a stud that cannot hold tension, which is exactly the recurring loosening problem people use anti-seize to try to prevent. A little on the hub's center register to stop the wheel rusting on is fine; keep the threads and seats clean and dry.
Only if the seat shape matches. Lug nuts come with conical, ball, and mag or shank seats, and the shape has to match the lug holes in the wheel. Most aftermarket wheels use a 60-degree conical seat, while some factory wheels use ball or mag seats. Putting the wrong shape in means the nut contacts on a narrow ring instead of the full seat, which deforms and beds in over the first few miles and lets the joint go slack. Reusing factory nuts on new wheels is one of the most common reasons a fresh set will not stay tight.
Within the first 50 to 100 miles of driving. Even a clean, correctly torqued installation settles slightly as the clamped surfaces bed in, and that settling costs you some of the clamp load. Re-checking with a torque wrench takes about ten minutes and prevents most cases of this problem. If the nuts have loosened again by that check even though the installation was done properly on clean surfaces, that is a strong sign the studs are damaged and should be replaced rather than simply retightened.
Treat it as unsafe. One loose nut means the remaining fasteners on that corner are carrying more than their share, and the wheel is likely already shifting against the hub, which damages the seats and studs further with every mile. If a single nut is slightly loose and the others are tight, retorque all of them properly and re-check within 50 miles. If more than one is loose, if you can move the wheel by hand, or if you feel wobble or hear clunking, do not drive it. Have it towed.
Compare the studs on that corner against each other and against another wheel. A stretched stud is often visibly longer than its neighbors, and its threads can look shiny and slightly drawn out where they have been pulled. Run a nut down by hand on each one; a damaged stud frequently lets the nut spin on with noticeably less resistance, or binds where the threads have deformed. The behavioral clue is just as useful: if the corner has loosened again after a clean installation at the correct torque on clean surfaces, assume the studs are compromised and replace the whole set on that corner.