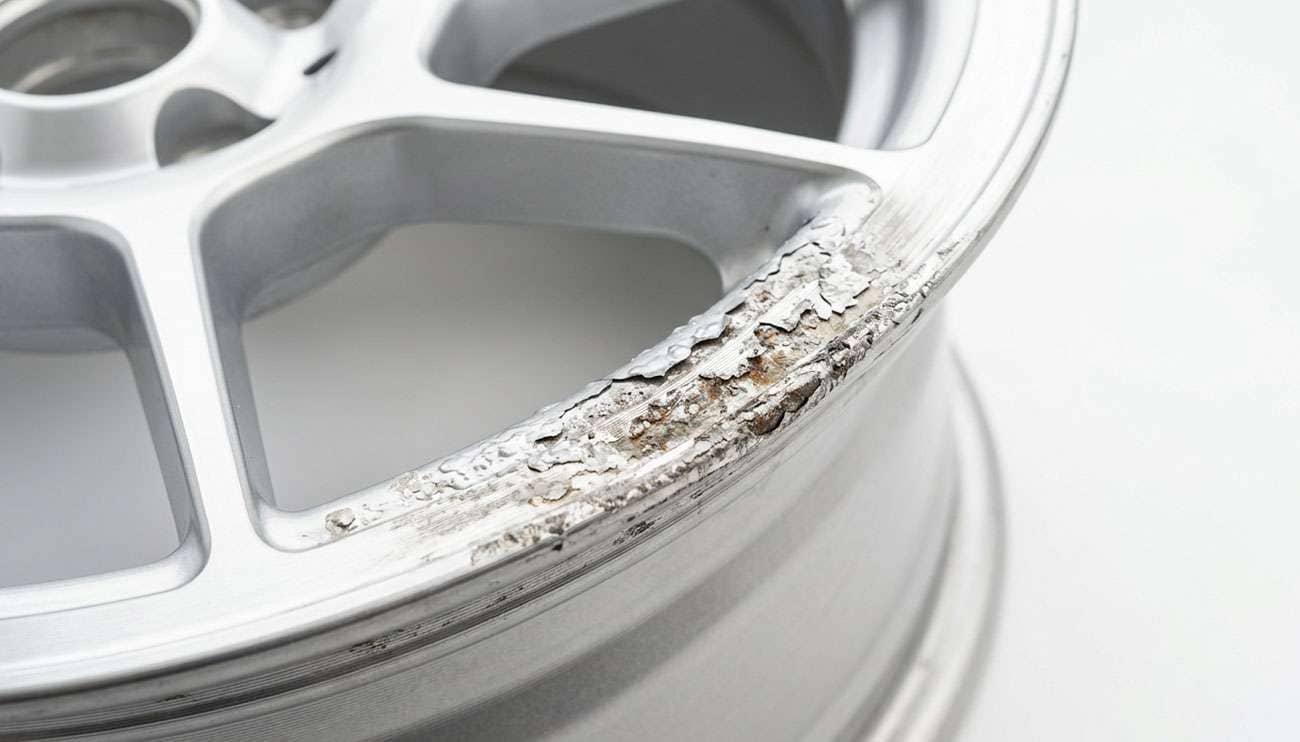
I have had this conversation across the counter more times than I can count. Somebody comes in holding a tire pressure gauge like it personally insulted them. One corner keeps going down. Four, five pounds a week. They have had it in the soapy water twice, found nothing, put a plug in it anyway just in case, and it is still doing it.
Here is the part nobody tells them: the tire is usually fine. The wheel is what is leaking. And the most common reason a wheel leaks is a ring of corrosion sitting on the sealing surface where the tire bead clamps down, which you cannot see, your tire guy cannot see, and nobody will see until that tire comes off the rim entirely.
So before you buy another tire or let somebody talk you into a new wheel, let us sort out where the air is actually going. There are four real answers, they cost wildly different amounts of money, and three of them have nothing to do with the tire.
Find the row that sounds like your car. The last column is what it should cost you, and the spread is the whole reason this article exists.
What You Are Seeing |
Most Likely Source |
How It Gets Confirmed |
What It Should Take to Fix |
|---|---|---|---|
3 to 6 psi a week, one wheel only, soapy water finds nothing on the tread |
Bead seat corrosion |
Tire dismounted, bead seat inspected |
Clean, resurface, seal. Under an hour of labor. |
Very slow, steady loss, sometimes on more than one wheel, no bead corrosion found |
Casting porosity |
Dunk tank, bubbles from the wheel face or barrel |
Interior adhesive sealant, or replacement if severe |
Loss that speeds up in cold weather, or started right after new tires |
Valve stem or TPMS sensor seal |
Soapy water at the stem base and around the sensor |
New stem or service kit. Cheapest fix on this list. |
Bubbles somewhere on the tread when you spray it |
Actual puncture |
Visible object or hole in the crown area |
Proper plug-patch from the inside, if it qualifies |
Started after a curb or pothole hit, wheel lip looks off |
Bent or damaged rim flange |
Spin the wheel, sight the lip against a reference |
Straightening if minor, replacement if not |
Roughly 1 to 2 psi a month, all four wheels, evenly |
Nothing. That is normal permeation. |
Compare all four over a month |
Check them monthly and stop worrying |
That last row matters more than people expect. Air migrates through rubber. A tire that drops a pound or two a month is behaving exactly the way it was designed to behave, and every tire on your car is doing it. If one corner is dropping several pounds a week and the other three are not, that is when you have a leak worth chasing.
Understand the geometry and the rest of this makes sense.
The tire does not seal against the wheel across some broad surface. It seals along two narrow rings, one on each side, where the tire bead is pressed against the machined bead seat of the rim. Air pressure inside the tire is what holds it there. It is a tight, high-pressure contact along a thin band of metal, and that band is completely enclosed by the tire itself.
Which means when corrosion grows on that band, it is sealed inside the assembly. You can wash the wheel, wax it, run your hand around the whole thing, and see nothing at all, because the damaged area is under the tire. The only way it becomes visible is if somebody breaks the bead and pulls the tire off the rim. That is a real service operation, not a two-minute check, and it is exactly why so many people go around the block three times with a leak nobody can find.
The same thing goes for your dashboard. Your TPMS is a pressure sensor, not a leak detector, and under the federal standard it is only required to warn you once you are 25 percent below the placard pressure. A wheel leak will have you topping off for months before the light ever comes on. If a slow leak is annoying you at the air pump every week, that is your warning system, not the dash.
This is the big one. If you have a mystery leak on an aluminum wheel and the tire checks out clean, corrosion at the bead seat is where the smart money goes.
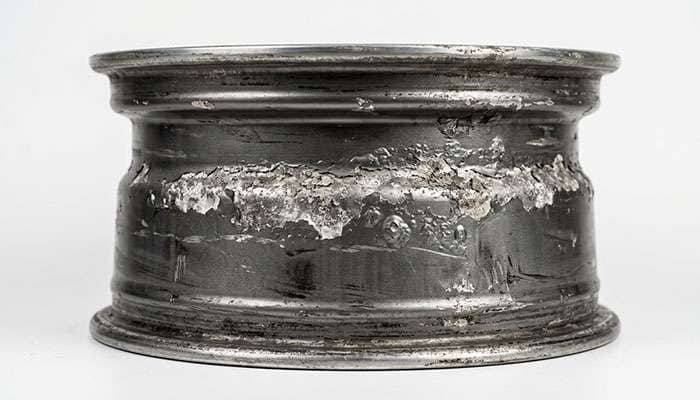
Here is how it happens. Grit works its way in between the tire bead and the rim. There is always a tiny bit of relative movement between tire and wheel while you drive, and that movement grinds the grit against both surfaces. Once the finish is worn through, moisture and road salt get to bare aluminum, and aluminum oxidizes fast. The oxide takes up more room than the metal it came from, so it lifts the surrounding finish and creates a rough, blistered, uneven surface. A tire bead cannot seal against that. Air finds a path and out it goes, slowly and steadily.
What it looks like once the tire is off: blistering of the finish along the sealing band, flaking paint, sometimes a chalky white powder. It shows up on the inboard side just as often as the outboard, which is another reason nobody catches it early. Nobody is looking at the back of the wheel.
Salt-belt cars get this worst, but do not assume you are safe in a dry climate. I have seen it on three-year-old wheels that looked showroom-new from the outside. If your wheels came off a car that spent winters anywhere near road salt, or spent years parked outside on grass or dirt, this is your first suspect. It also runs in the family with chrome wheels that have started to rust, since once plating lifts anywhere on the wheel, the same process is usually underway at the bead too.
Porosity is when the aluminum casting itself has microscopic voids running through it and air seeps out through the body of the wheel rather than at any seal. Search this topic online and you will find porosity blamed for practically every slow leak on an alloy wheel.
It is real, but it is nowhere near as common as the forums claim, and it is worth knowing why. Porosity was a genuine headache with older sand-cast wheels, to the point that plenty of them had to be run with inner tubes. Modern permanent-mold and low-pressure castings are much denser. A void has to actually connect to form a leak path, and most do not.
How you tell them apart: porosity leaks are usually slower and steadier than bead corrosion, they can turn up on more than one wheel from the same batch, and in a dunk tank the bubbles come off the wheel face or the inside of the barrel rather than the bead line. The fix is different too. You do not sand porosity out. It gets sealed from the inside of the wheel with an adhesive sealant, and the manufacturers treat it as an entirely separate repair procedure from bead corrosion.
Practical takeaway: if a shop tells you your wheel is porous without having dismounted the tire and done a proper leak test, they are guessing. Ask them to show you where the bubbles came from.
Cheapest thing on the list and the one most often skipped, so check it first.
A rubber valve stem is a consumable. It sits out in the weather taking UV, ozone, brake dust, and road chemicals, and it gets hard and cracks with age. Flex an old one side to side with your finger and you will sometimes hear the leak start right then. The base where it passes through the rim is the usual spot. There is also the core inside the stem, which can seep on its own, and losing the cap lets grit sit right on top of it.
If you have TPMS, there is a second seal to think about. Most sensors clamp to the rim with a grommet and a nut, and that grommet ages just like a rubber stem does. That is why any decent shop installs a new service kit whenever the tire comes off. If yours did not, and the leak showed up shortly after your last tire change, you have a strong candidate.
Spray soapy water around the base of the stem, then around the nut, and watch for a good thirty seconds. These leaks are slow and the bubbles build gradually. It is worth checking your valve stems on all four while you are down there, because if one has aged out, the rest are the same age.
Before we start pointing at the wheel, do the honest work of clearing the tire. Takes ten minutes in the driveway.
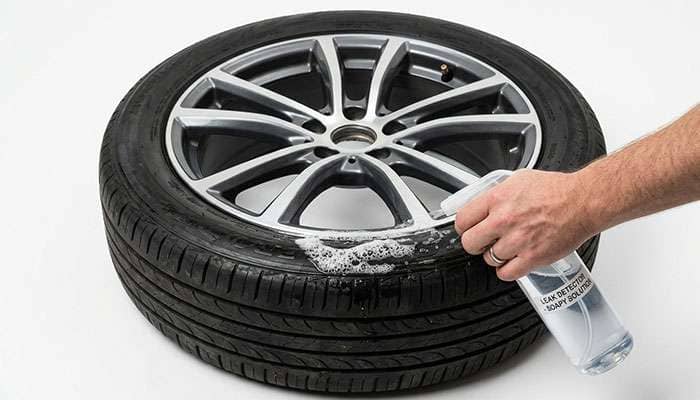
If steps three through six turn up nothing and that corner is still going down several pounds a week, you have arrived at the answer this article is about. The leak is at the bead seat, under the tire, and confirming it requires dismounting.
This is the part I want you walking into the shop already knowing.
General Motors publishes a service bulletin covering exactly this condition on its passenger cars and light trucks, and it is filed publicly with NHTSA. It is written for dealer technicians, and its instruction to them on a slow-leaking wheel is blunt: "Do not replace the wheel if it can be repaired" within the limits it lays out. The bulletin tells the technician not to replace a wheel for slow air loss until the repair has actually been evaluated or attempted.
The limits are specific, and they are worth committing to memory:
Vehicle Mileage |
Repairable Corrosion Area |
Beyond That |
|---|---|---|
20,000 miles or less |
Up to 100 mm, about 4 inches, of combined linear area |
Wheel gets replaced |
Over 20,000 miles |
Up to 200 mm, about 8 inches, of combined linear area |
Wheel gets replaced |
The repair itself is not exotic. The technician dismounts the tire, sands the corrosion off the bead seat with a fine-cut disc until they reach sound metal, tapers the edges so there is no sharp step for air to track along, takes off only what is necessary to keep the sealing surface flat, then coats the area with a bead sealant and remounts. The sealant sets enough to mount the tire in roughly ten minutes at normal shop temperature.
Now the number that ends the argument. The warranty labor time GM allows for that repair is six tenths of an hour per wheel. Call it thirty five minutes. At a typical shop rate that is somewhere in the neighborhood of sixty to a hundred dollars, plus mount and balance, against a replacement wheel that runs from a couple hundred to well over a thousand on some vehicles.
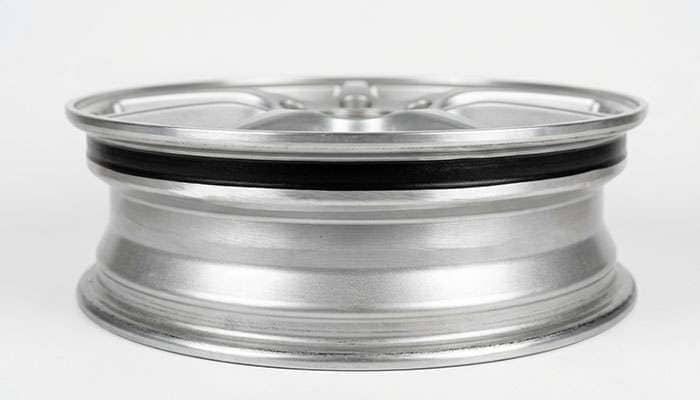
So if you are told a leaking wheel needs replacing, the fair question is simple. Did you dismount it and measure the corrosion? If the answer is no, nobody has established that yet. Worth reading our breakdown on whether it is cheaper to repair or replace a rim before you decide either way.
One honest caveat, because I am not going to sell you a fantasy. Those exact numbers come from one manufacturer's procedure for its own vehicles. Other makers have their own bulletins and their own thresholds, and an independent shop is not bound by any of them. What travels is the principle: this is a known, documented, repairable condition with published limits, and a wheel should get measured before it gets condemned.
If you are running chrome or polished wheels, this section is for you, and I will be straight about it.
The repair works on the leak. Sand the corrosion, seal it, mount the tire, and the air stays in. But that same bulletin carries a specific warning about chromed aluminum: the procedure may correct the condition without giving a lasting cosmetic repair. In plain terms, you are taking abrasive to a plated surface. The leak goes away. The finish in that band does not come back.
Now, that band lives under the tire where nobody sees it, so functionally, who cares. The bulletin itself allows for the repair as a reasonable alternative to buying a wheel when the customer is paying out of pocket. But it is why chrome wheel owners get steered toward replacement more often than anyone else, and it is why the plated stuff is more prone to this in the first place. Plating is hard and it is brittle. Once it lifts or chips anywhere along the bead seat, corrosion gets underneath and spreads sideways between the plating and the aluminum, which is a bigger affected area than you would get on a painted wheel with the same starting damage.
Chrome-clad wheels, the ones with a chrome-look plastic skin bonded to an aluminum wheel, sit in a different spot. The bead seat on those is normal aluminum with the cladding elsewhere, so the repair is straightforward there.
The upshot for anyone shopping: powder-coated and painted wheels resist this better than plated ones, full stop. That is not me talking down chrome. I like chrome. But if your car sees salt or sits outside, you should go in knowing which finish is going to fight you at the bead seat in year six.
People treat a slow leak as a minor chore. Here is the actual bill.
Fuel and tire life, immediately. A tire running several pounds low most of the week is not just soft, it is flexing more than it was built to. That is wasted fuel and it wears the shoulders faster than the center. You are grinding up the tire while you wait to deal with the wheel.
Heat, once the weather turns. A chronically low tire builds heat, and heat is what kills tires from the inside. This is the mechanism behind belt separation and blowouts, and it does not care that you meant to get to it. Add a hot afternoon and a loaded car and the margin gets thin.
The corrosion is still growing. This is the one that actually costs money. The affected area does not hold still. Every week you drive on it, grit keeps working, oxide keeps spreading, and the linear area of corrosion keeps getting longer. A leak caught early is comfortably inside the repairable window. The same leak ignored for a year and a half may not be. You can literally spend a wheel by waiting.
The sealant trap. Somewhere in month three, someone suggests a can of tire sealant. Do not. It coats the inside of the tire, it fouls the TPMS sensor, and the shop now has to clean the whole mess out before they can even find your leak. Plenty of shops charge extra for the privilege, and some will refuse the job.
Diagnose it, yes. Repair it, realistically no, and I will tell you why rather than just waving you off.
The bead has to be broken and the tire pulled off the rim to reach the sealing surface at all. Breaking a bead without a machine is genuinely hard and it is how people damage the tire, the rim lip, or themselves. Then you need the right abrasive and enough restraint to remove the corrosion without dishing the sealing surface, because the whole point is a flat, smooth band. Take too much and you have created the problem you were trying to fix. Then it needs proper bead sealant, remounting, and a real balance afterward.
What you absolutely should do yourself is everything up to that point. Confirm which corner. Confirm it is not the tread, not the stem, not the rim lip. Walk in and tell them you have a bead seat leak you would like inspected and repaired if it measures within limits, rather than walking in and saying it keeps going flat. Those two sentences get very different outcomes.
And keep a real gauge in the glovebox. Not the pencil one that has been rolling around since 2009. A digital gauge that reads consistently is how you tell a four-pound-a-week problem from normal permeation, and that distinction is the whole ballgame here.
I have spent this whole article arguing against replacing wheels, so let me be fair about when replacement is the right call.
One more thing while the tire is off. Have them look at the safety hump, the raised ridge just inboard of the bead seat that holds the bead in place if you lose pressure. If corrosion has gotten into that, replace the wheel and do not think twice. That ridge is what keeps a tire on the rim in a deflation event, and it is worth understanding what the bead seat and safety hump actually do before you sign off on anything.
If you do end up needing a wheel, buy for the conditions that killed the last one. Powder-coated and painted finishes hold up at the bead seat better than plated ones, and a set that is easy to keep clean is a set that does not start this cycle over.
Wheel |
Size Shown |
Finish |
Price |
|---|---|---|---|
15x6, 5x114.3 / 5x120.65 |
Silver |
$75.00 |
|
15x10, 5x114.3 |
Gloss Black Powdercoated |
$95.00 |
|
16x8, 5x114.3 |
Gloss Black Machined |
$131.47 |
|
19x10, 5x114.3 |
Satin Black |
$186.77 |
Whatever you land on, match the bolt pattern, offset, and hub bore to your vehicle, and have new valve stems or TPMS service kits installed at the same time. You have the tire off already. Do not put a ten-year-old rubber stem back into a fresh wheel and start this whole story over.
A tire that loses a pound or two a month is normal. A tire that loses several pounds a week, on one corner, with nothing showing in the tread, is a wheel leak until proven otherwise. Most of the time it is corrosion sitting on the bead seat, which nobody can see until the tire comes off, and which grows the longer you put it off.
Do the ten-minute driveway check so you can rule out the tread, the stem, and the rim lip yourself. Then go in asking for the bead seat to be inspected and measured. It is a documented, repairable condition with published limits and a labor time under an hour, and the manufacturer's own instruction to its dealers is not to replace a wheel until that repair has been considered.
And if it does turn out to be past saving, come see what we have. Performance Plus Tire carries wheels in every size and finish across classic, custom, truck, and off-road, and we will help you match the fitment so the new set goes on right the first time.
The short version, for the guy standing at the air pump.
If soapy water finds nothing in the tread, the air is almost certainly leaving somewhere other than the tire. The four common sources are corrosion on the wheel bead seat where the tire seals against the rim, porosity in the aluminum casting, an aged valve stem or TPMS sensor grommet, and a bent rim flange from a curb or pothole. Bead seat corrosion is the most common and the hardest to spot, because it sits under the mounted tire and cannot be seen until the tire is dismounted from the wheel.
In most cases yes. The standard repair is to dismount the tire, sand the corrosion off the bead seat back to sound metal, taper the edges, coat the area with a bead sealant, and remount. Manufacturer procedure sets limits on how much corrosion is repairable, measured as combined linear area along the sealing band, and instructs technicians not to replace a wheel for slow air loss until that repair has been evaluated or attempted. Beyond those limits, or if the corrosion has pitted deep rather than spread wide, the wheel is replaced.
Roughly one to two psi per month is normal permeation through the rubber, and it happens on every tire. Ambient temperature also shifts pressure by about one psi for every ten degrees Fahrenheit, so a cold snap can drop readings several pounds without any leak at all. The way to tell the difference is to check all four tires against each other over the same period. If three hold steady and one drops several pounds a week, that fourth one has a real leak.
Not early. The federal standard requires the warning light to come on once pressure is 25 percent or more below the placard specification, so on a tire placarded at 35 psi the light will not appear until you are down around 26 psi. A wheel leak can have you topping off weekly for months before that threshold is reached. A gauge checked monthly will catch it long before the dashboard does, and the sensor itself can also be the leak.
No, not for a persistent slow leak. Aerosol sealant is an emergency product for getting a punctured tire off the roadside, and it does nothing for a leak at the bead seat or the valve stem. It coats the inside of the tire, can foul a TPMS sensor, and has to be cleaned out before any shop can properly leak-test the assembly. Many shops charge extra to deal with it and some decline the work entirely, so you end up paying more to reach the same diagnosis.
Plated finishes tend to give more trouble at the bead seat. Chrome plating is hard and brittle, so once it chips or lifts along the sealing band, corrosion works underneath it and spreads sideways between the plating and the aluminum. Repair is still possible and it does stop the leak, but manufacturer guidance notes the sanding involved will not leave a lasting cosmetic result on chromed aluminum. Since the repaired band sits under the tire where nobody sees it, that is usually an acceptable trade rather than a reason to buy a new wheel.