Vintage aluminum wheels from the 1960s through the early 1980s are among the most restorable automotive components you will ever work with, and they are also the most commonly ruined by well-intentioned owners attempting to polish them the wrong way. Unlike modern clearcoated alloys, which are engineered to be cleaned and sealed rather than reworked, period-correct cast aluminum wheels from that era were typically produced with either a raw polished finish or a factory clearcoat that was meant to be refreshable over time. The correct restoration process depends on which type you have and what condition it arrives in.
The general principles are not complicated. Inspect first, identify the finish type, progress through the appropriate grits without skipping steps, and stop at the right moment. What separates a professional-grade restoration from a botched one is patience and the right material choices. Done correctly, a set of vintage Cragar, Torq Thrust, Centerline, or American Racing wheels can come out of the garage looking better than when they left the factory. Done incorrectly, you can turn a $600 set of period-correct rollers into scrap in an afternoon.
This guide covers the full process.
Three things distinguish vintage aluminum wheels from the clearcoated alloys produced today.
Construction method. Most vintage wheels from 1965 through 1985 are sand-cast or gravity-cast aluminum — an older process that produces slightly softer, more porous metal than today's low-pressure casting or forging. That porosity is exactly why period-correct wheels polish to such a deep mirror finish, but it also means the surface accepts corrosion faster once the protective layer fails. For the full construction differences, our article on steel vs. aluminum wheels for classic cars covers the materials side.
Finish type. Vintage wheels shipped with one of several finishes: raw polished (no topcoat, designed to be maintained), factory clearcoat (a thin lacquer designed to protect the polish for several years before needing refresh), chrome-plated aluminum (thin nickel-chrome layer over polished aluminum), or painted spokes with polished outer lips (two-tone). Each finish demands a different restoration approach. Misidentifying the finish and applying the wrong process is the most common cause of ruined restorations.
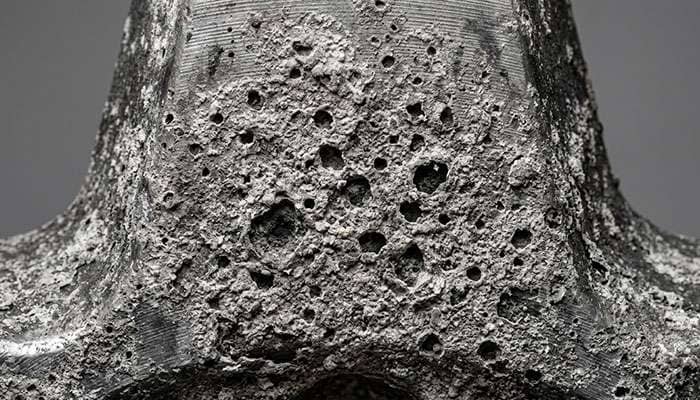
Oxidation pattern. Aluminum does not rust the way steel does. It oxidizes — the surface layer of aluminum metal reacts with atmospheric oxygen to form aluminum oxide, which appears as a dull, grayish-white powder or a milky haze on what used to be a shiny surface. Unlike rust, oxidation is not progressive into the metal — it forms a stable layer that actually protects the metal beneath. But it is cosmetically awful, and left alone for years it can work its way into the grain boundaries of sand-cast aluminum and produce pitting.
Before you consider any restoration work, inspect each wheel for conditions that change or stop the project.
1. Structural cracks. Examine the back side of the wheel, particularly around the center hub area, the lug holes, and where the spokes meet the outer barrel. Cracks in cast aluminum are not cosmetic — they indicate fatigue failure and the wheel should not be used on the road. Hairline cracks sometimes become visible only after cleaning, which is why this inspection happens after a basic wash but before any polishing work.
2. Bead seat corrosion. The bead seat is the inside circumference of the wheel where the tire seals against the rim. Corrosion here creates slow leaks and makes tire mounting difficult. Bead seat corrosion must be addressed, not just the cosmetic outer surfaces. This is especially common on wheels that spent time in salt-belt climates or sat with tires mounted for decades.
3. Bent or out-of-round. Place the wheel on a flat surface and check for wobble. A spin on a tire balancer at a shop confirms whether the wheel runs true. A bent wheel can sometimes be straightened by a wheel repair specialist, but it is not a DIY fix and doing cosmetic polishing on a bent wheel is wasted effort.
4. Date codes and authenticity. Vintage wheels often carry date stamps on the back side. Genuine period-correct Cragar S/S, American Racing Torq Thrust, and similar wheels can be valuable collector pieces. Our guide on who manufactures Cragar wheels covers authentication. Confirming authenticity changes the calculus — if the wheels are valuable originals, a professional restoration may preserve value better than DIY.
5. Existing damage. Deep gouges, welded repairs, filled sections, or previous bad restoration work may limit what a polish can achieve. Document existing damage before starting so you can set realistic expectations for the final result.
Before sanding anything, determine which original finish you are working with. This decides the entire process.
Raw polished aluminum. No topcoat. The surface is bare aluminum that was polished at the factory and was designed to be polished again periodically. Test: scratch a hidden area with a fingernail — if the surface dulls uniformly and you can buff it back, it is raw. Common on Centerline Auto Drag wheels, early polished American Racing wheels, and many drag race wheels.
Factory clearcoat. A thin acrylic or urethane lacquer applied over polished aluminum. Test: examine closely for a slight surface sheen different from the underlying metal and look for flaking, yellowing, or peeling patches — these indicate clearcoat breakdown. Common on most 1970s American Racing Torq Thrust wheels and many luxury OEM alloys of the era.
Chrome-plated aluminum. A thin nickel-chrome plating applied over polished aluminum. Test: chrome has a harder, more reflective look than polished aluminum and a distinctive cool tone. If the plating is peeling, you will see raw aluminum underneath. Chrome plating cannot be restored by polishing — it must be stripped and re-plated by a professional plating shop. For a comparison, see our article on chrome vs. polished wheels.
Two-tone painted and polished. Spokes or inner sections painted (often satin black, gray, or argent silver), outer lip and rim polished aluminum. Restoration requires masking one area while working the other, or stripping both and refinishing separately.
Anodized aluminum. Less common on vintage wheels, but some period-correct pieces used anodizing for a colored or gold finish. Anodizing cannot be polished — it requires professional stripping and re-anodizing.
A proper restoration uses specific materials. Substituting household items for specialty products produces inferior results and can damage the metal.
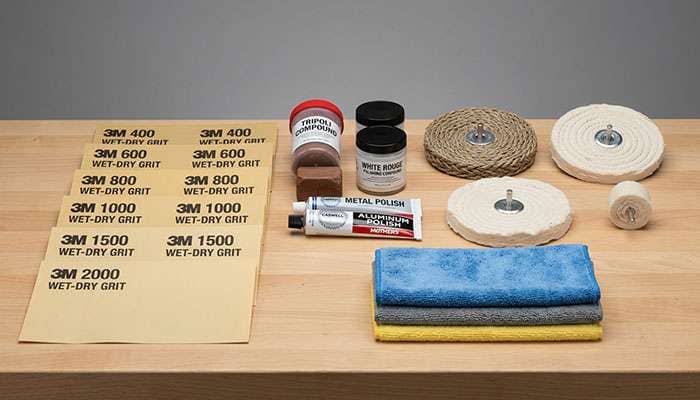
Dismount the tire. Trying to restore a wheel with a tire still mounted compromises the result. Have a shop dismount and plan to remount and rebalance after the work is done.
Wet-dry sandpaper in a grit progression. For raw aluminum, keep 400, 600, 800, 1000, 1500, and 2000 grit on hand. Skipping grits is the single most common DIY mistake — the finer paper cannot erase the scratches left by the coarser paper.
Aluminum-specific polishing compounds. Tripoli or brown compound for cutting. White rouge or "blue magic" for finishing. Never use compounds designed for chrome or paint — they contain different abrasives that do not work on aluminum or leave residue.
Cotton or wool buffing pads. Sisal wheels for cutting, loose cotton for color, soft wool for final finish. A variable-speed drill, bench grinder with buffing arbor, or dedicated polishing machine runs them.
Degreaser and aluminum cleaner. A dedicated aluminum wheel cleaner, NOT a general-purpose acid-based cleaner. Acidic cleaners etch aluminum and make the problem worse.
Safety gear. Safety glasses (absolute requirement with buffing wheels), gloves, and a dust mask for the sanding stages. Polishing compounds produce fine dust and used pads can sling material at high speed.
Clearcoat or wax. For the protective final step. Aerosol automotive clearcoat rated for wheels, or a high-quality hard paste wax specifically designed for bare metal.
Raw aluminum is the simpler of the two DIY-appropriate processes because there is no coating to strip. The entire job is surface reconditioning.
Step 1: Degrease thoroughly. Spray on aluminum wheel cleaner, let it dwell per the manufacturer's instructions, agitate with a soft brush, rinse, and dry completely. Every polishing step after this works best on a perfectly clean surface.
Step 2: Assess the starting condition. Lightly polished wheels with surface haze may need only the final polishing stages. Heavily oxidized wheels with visible pitting will need to start at 400 grit. Wheels in between typically start at 600 or 800.
Step 3: Wet-sand in progression. Work one section at a time. Use water as a lubricant. Sand in one direction — typically along the grain of the spoke or around the circumference of the lip — with even pressure. Do not concentrate too long in one area. When the surface shows uniform scratching at the current grit, move to the next finer grit and sand at a 90-degree angle to the previous direction. This cross-hatching approach ensures you are cutting down the scratches from the previous grit instead of just adding parallel lines.
Step 4: Polish through the compound sequence. Apply cutting compound (Tripoli or brown) to a sisal buffing wheel at moderate speed. Work the surface in short passes, keeping the wheel moving to prevent heat buildup. Heat distorts aluminum and discolors compound residue. Follow with white rouge on a cotton wheel, then final color buff with a clean soft pad.
Step 5: Clean between stages. Residual compound from the cutting stage will contaminate the finishing stages. Wipe thoroughly with a clean microfiber and mineral spirits between compounds.
Step 6: Final finish. A mirror finish should reflect clearly enough to read text. If the reflection is hazy, the previous stage was either insufficient or contaminated.
Step 7: Protect. Raw aluminum will begin oxidizing again within weeks of exposure. Seal with automotive clearcoat for long-term protection, or a high-quality paste wax for period-correct show-car maintenance. Waxed finishes need refreshing every three to six months.
Clearcoated wheels require a different decision up front: preserve the existing clearcoat, or strip and refinish entirely.
When the clearcoat is still intact. Light surface contamination, some water-spotting, and minor yellowing can sometimes be corrected with automotive polish and a sealant. Test a small hidden area first with a mild compound on a microfiber pad. If it improves without removing the clearcoat, proceed with that method across the whole wheel.
When the clearcoat is failing. Flaking, peeling, yellowing, or cloudy clearcoat must be stripped entirely. Partial stripping produces a patchy finish that looks worse than the original failure. Use a commercial aircraft stripper (these contain methylene chloride or newer safer solvents) per the manufacturer's instructions, rinse thoroughly, and proceed with the raw aluminum restoration process from the degrease step onward.
Re-applying clearcoat. Once the aluminum is polished to final finish, apply automotive clearcoat in multiple thin coats per the can's instructions. Environmental conditions matter — low humidity, moderate temperature, and dust-free surroundings produce the best result. Allow full cure time (typically 48 hours minimum, longer for full durability) before handling or remounting tires.
Alternative: professional refinishing. For collectible wheels, professional refinishing with oven-cured clearcoat produces a more durable finish than rattle-can aerosol. Budget $75 to $150 per wheel for professional clearcoat refinishing, or more for polish-plus-clearcoat packages.
Different vintage wheel lines have known quirks worth understanding before you begin.
Cragar S/S Super Sport. The iconic five-spoke chrome-plated aluminum wheel is aluminum underneath a nickel-chrome plate. If the plating is failing, polishing will not save it — these need to be stripped and re-plated by a specialist or replaced. Original Cragars with intact chrome can be maintained with chrome polish, not aluminum polish. For background on the brand, see who manufactures Cragar wheels.
American Racing Torq Thrust (original VN105 and VN205). Early Torq Thrust wheels shipped with polished aluminum spokes and a polished lip. Later versions added clearcoat. Identify which version you have before starting. Reproductions are widely available today and often easier to refinish than 50-year-old originals with extensive wear. Our review of the American Racing Torq Thrust wheels covers the history.
Centerline Auto Drag and Convo Pro. Two-piece welded construction with extensive polished surfaces. Pay special attention to the weld lines during restoration — they accept polish differently from the main body. Raw polished finish, designed for refresh. Avoid aggressive sanding directly on welds.
Appliance Vector, U.S. Indy Mag, and similar spider-style wheels. Cast aluminum with intricate spoke patterns. Getting into tight crevices requires small buffing attachments, Dremel-style tools with polishing points, or hand work. Budget extra time for these designs.
Rocket Racing and Boyd Coddington hot rod wheels. Later-era custom wheels, often with modern clearcoats. Usually easier to work with than 1960s pieces because the original finishes were better protected from the factory.
Two-tone painted/polished wheels. Masking is essential. Use quality automotive masking tape, not general-purpose tape — the adhesive must come off cleanly without residue. Mask the paint, work the polish, then remove masking. If the paint also needs refresh, do that work last after the polish is sealed.
For a broader look at the vintage wheel landscape, see our article on the names of muscle car wheels from vintage to modern. The existing guide on restoring an aluminum wheel covers the general four-step approach for any aluminum wheel as well.
The restoration is not complete until the finish is protected. Vintage aluminum exposed to atmosphere begins re-oxidizing almost immediately, and oxidation returning within months undoes the work.
Option 1: Automotive clearcoat. Best long-term protection. Modern urethane clearcoats rated for wheels resist UV, brake dust, and road salt for several years. Apply in thin coats per manufacturer instructions. Professional oven-cured clearcoats outperform rattle-can for durability.
Option 2: Ceramic coating. Modern ceramic coatings designed for wheels are a strong option. They produce a hydrophobic surface, resist brake dust adhesion, and can last two to five years depending on product and conditions. More expensive than clearcoat but maintenance-light.
Option 3: Hard paste wax. The period-correct and most authentic option. Mothers Mag and Aluminum Polish, followed by a quality carnauba wax, delivers a finish that looks right on a show car. Requires refresh every three to six months depending on driving and weather exposure.
Option 4: Sealant sprays. Modern polymer sealants bridge the gap between wax and ceramic. Longer-lasting than wax, less expensive than ceramic, though not as durable as either. Reasonable for a daily-driver classic that sees regular use.
For any of these options, proper preparation is essential. The wheel surface must be completely clean, cool, and free of polishing compound residue. Contamination trapped under a sealant does not come out without stripping and starting over.
For additional ongoing care guidance, see our article on how to make your alloy wheels last forever.
Some conditions are beyond what a home restoration can fix. Recognizing them before investing 20 hours of work saves money and disappointment.
Deep pitting. Oxidation that has progressed into the metal surface produces pits that cannot be polished out without removing too much material. Deep pits require professional wheel refinishing with filler-grade polishing or partial machining. Past a certain depth, replacement is more economical than restoration.
Structural cracks or welded repairs. A cracked wheel is not a restoration candidate — it is a safety issue. A wheel with visible weld repairs of structural cracks should be evaluated by a specialist before any cosmetic work.
Chrome plating failure. DIY chrome restoration is not practical. Specialist plating shops handle strip-and-replate work. Budget accordingly or consider replacing with a polished aluminum equivalent.
Center hub areas and lug seats. The critical bore and lug seat surfaces require precision machining, not polishing. Do not attempt to polish these areas aggressively. If they need attention, a wheel repair specialist has the tools.
Valuable collector wheels. Original matched-number-set Torq Thrust Ds, genuine Cragar S/S from specific years, or documented race-provenance wheels may be worth more in patinated original condition than professionally restored. Consult a collector-car wheel specialist before stripping and polishing wheels whose value depends on authenticity.
Once the restoration is complete, the finish lasts as long as the maintenance does.
Weekly (for a daily-driven classic). Rinse with pH-neutral cleaner or plain water to remove brake dust before it sets. Never use acidic wheel cleaners on vintage aluminum.
Monthly. Detailed cleaning with a quality aluminum wheel cleaner. Inspect the finish for early signs of contamination, tar spots, or sealant breakdown.
Seasonally (for waxed finishes). Apply a fresh coat of paste wax every three to six months, more often in high-exposure conditions.
Annually. Full detail cleaning, inspect all four wheels for any new cracks, damage, or oxidation spots. Touch up the protective coating as needed.
Every 3-5 years (for clearcoated finishes). Evaluate the clearcoat for yellowing, flaking, or peeling. Refresh before failure becomes visible to avoid a full restoration cycle.
Vintage aluminum wheels reward patience and punish shortcuts. The restoration process is not technically difficult, but every stage depends on the one before it — skip a sanding grit, contaminate a polishing stage, or rush the protection step, and the final result suffers. Work methodically, use the right materials, and stop when the finish shows the quality you want to preserve.
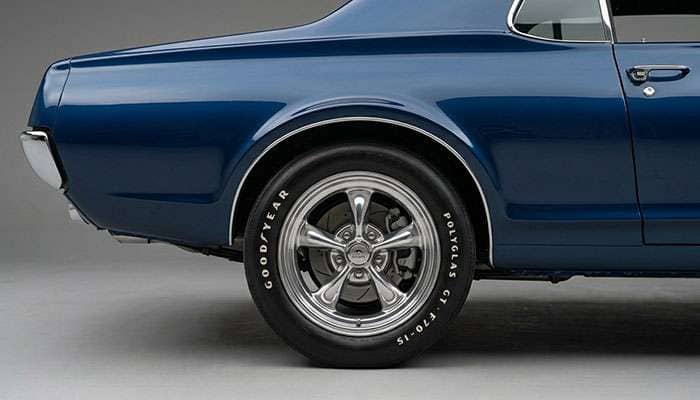
The payoff is a set of wheels that look better than they did when they rolled out of the factory. Period-correct aluminum finishes have a depth and warmth that modern clearcoated alloys cannot reproduce, and a well-restored set of vintage Cragars, Torq Thrusts, or Centerlines is one of the most rewarding components on a classic car.
If replacement becomes the better option — deep pitting, structural damage, or simply wheels too far gone — Performance Plus Tire stocks period-correct reproductions of most popular vintage wheel designs alongside modern classic-style options with better long-term finishes.
Yes, if the wheels are raw polished aluminum or factory clearcoated and not too heavily pitted. The process involves sanding through progressive grits from 400 or 600 up through 2000, then polishing with aluminum-specific cutting and finishing compounds on buffing wheels. Deep oxidation pits that have worked into the metal grain may not polish out completely.
Sometimes. Light surface contamination and minor water spotting on intact clearcoat can be corrected with mild automotive polish and a sealant. Failing clearcoat — flaking, peeling, yellowing, or cloudy — must be stripped completely before restoration; partial stripping produces a patchy finish. Test a hidden area before polishing the whole wheel.
Expect two to four hours per wheel for a full raw-aluminum restoration if the tire is dismounted and the wheel is reasonably accessible. Heavy oxidation, pitting, or intricate spoke patterns can extend that significantly. A full set of four wheels typically represents a full weekend of work at minimum, more if clearcoat application is involved.
Polishing reconditions an existing finish by working the surface with sandpaper and polishing compounds to remove oxidation and restore shine. Refinishing involves stripping any existing topcoat (clearcoat, paint, or plating) and rebuilding the finish from raw metal — more involved and often the correct approach when the original coating has failed.
Yes for maintenance polishing of wheels that are already in good condition. Mothers Mag and Aluminum Polish, Simichrome, Flitz, and similar products are excellent for maintaining a mirror finish after a full restoration. They are not aggressive enough to correct heavy oxidation or pitting on their own — that requires sandpaper and cutting compounds.
Not required, but strongly recommended for daily-driven classics. Raw polished aluminum begins re-oxidizing within weeks of exposure to the atmosphere. Options range from hard paste wax (period-correct, needs refresh every 3–6 months) to automotive clearcoat (lasts 2–5 years) to ceramic coating (2–5 years, strongest protection). Show-car wheels that see limited road use can remain raw with frequent waxing.